It still amazes me that with just two basic ingredients milk and vinegar I can create Cheese at Home that rivals any store bought spread. As a chef, I love recipes that strip things back to the essentials. No fancy cultures, no complex equipment, just simplicity and flavor. This one checks all those boxes. The first time I tried it, I wasn’t expecting much. But when I tasted that warm, buttery curd with herbs, I was hooked. This is the kind of cheese that makes you fall in love with cooking all over again.
“Turns out, making cheese at home is way easier and tastier than I ever thought.” – @KitchenCurdled
Why I Love Making This Cheese
- Simple ingredients: Just milk, vinegar, salt, and herbs. No mystery chemicals or preservatives.
- Fast results: The cheese is ready in under 30 minutes faster than a trip to the store.
- Custom flavor: I can tweak it endlessly with herbs, spices, or different types of vinegar.
- Zero waste: The leftover whey can be reused in baking or smoothies. Nothing goes to waste.
If you enjoy experimenting like I do with recipes such as homemade milk buns or sesame breadsticks, you’ll appreciate how this cheese lets you feel like a food scientist but in the most comforting way.
Ingredients You’ll Need
- 1.5 liters full fat milk (about 6 1/3 cups)
- 2 tablespoons apple cider vinegar (30 ml)
- Salt, to taste
- 50 grams melted butter (1/4 cup)
- 1 tablespoon Provencal herbs (15 ml)
Make sure to use fresh, full fat milk. Skim or ultra pasteurized milk doesn’t curdle as cleanly, and the texture will suffer. I’ve learned this the hard way use the real stuff, and you’ll thank yourself later.
Step by Step to Make Homemade Cheese
1: Heat the Milk
- Pour the milk into a large, heavy bottomed pot and place it over medium heat.
- Stir occasionally to prevent any scorching on the bottom.
- Bring it up to a gentle simmer not boiling just when you start to see small bubbles form around the edges.
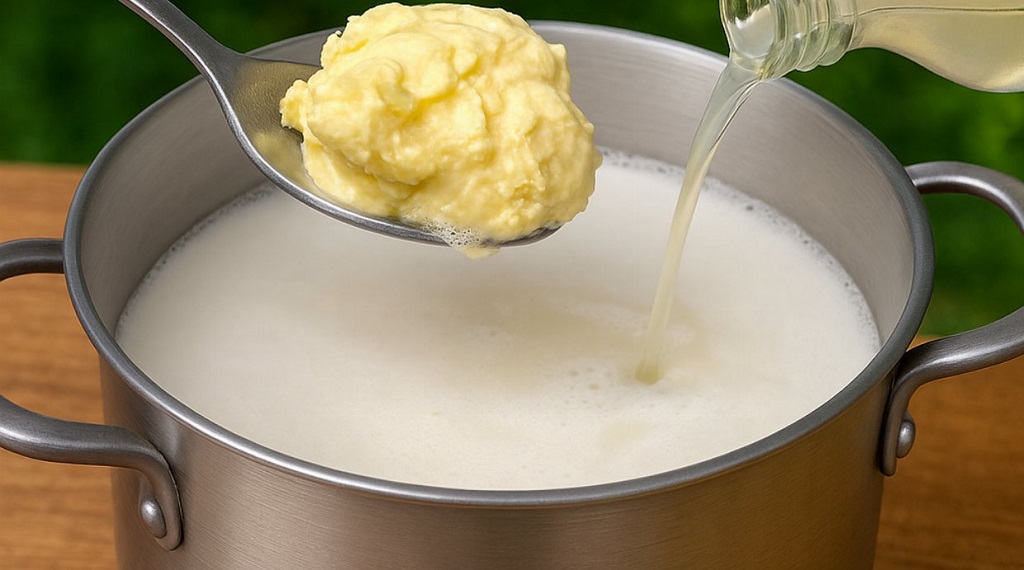
2: Add Vinegar to Curdle
- Once the milk is hot and steamy, pour in the apple cider vinegar slowly while stirring gently.
- You’ll see it almost immediately: soft white curds separating from the yellowish whey.
- Stop stirring and let the mixture sit for about 5 minutes to fully develop the curds.
3: Strain the Curds
- Line a colander with cheesecloth or a clean dish towel and set it over a bowl.
- Carefully pour the curdled milk into the lined colander to strain out the whey.
- Let it sit and drain for 10-15 minutes until it firms up a bit.
4: Mix in Flavor
- Gather the cheesecloth and squeeze out any remaining whey.
- Transfer the curds to a mixing bowl and add a generous pinch of salt.
- Stir in the melted butter to add creaminess this transforms the texture.
- Finish with a sprinkle of Provencal herbs, stirring gently to distribute evenly.
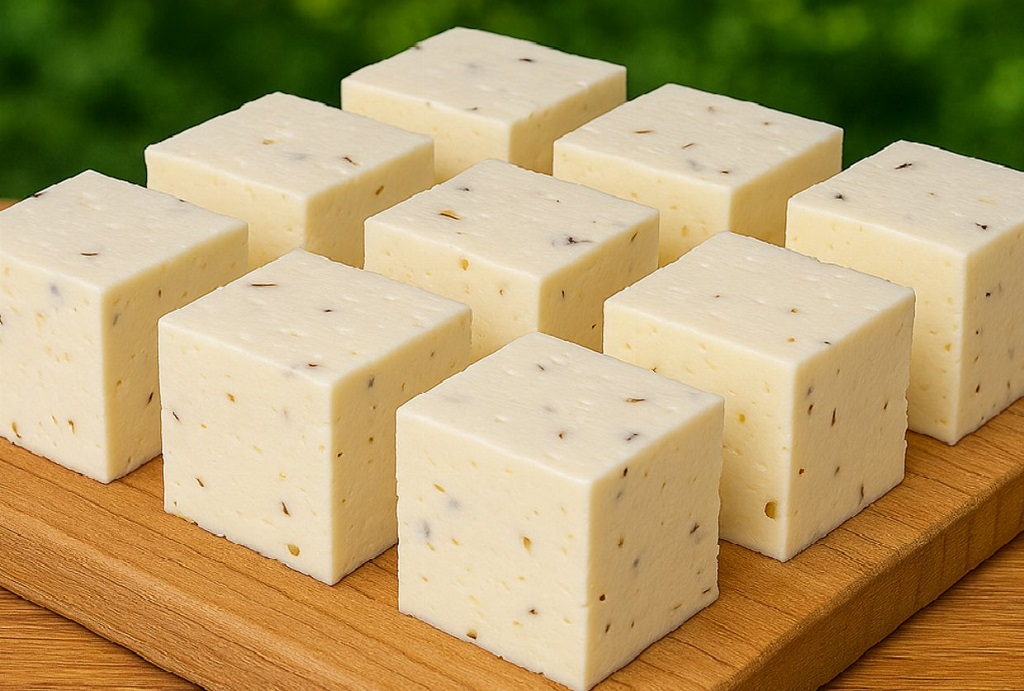
5: Shape and Chill
- You can form the cheese into a ball or press it into a mold for a more structured look.
- Cover and refrigerate for at least 1 hour if you prefer a firmer texture.
“The texture is rich and spreadable, like a cross between ricotta and cream cheese but better because you made it yourself.” – @ButterAndCurds
Flavor Variations I’ve Tried and Loved
This recipe is a blank slate. Once you nail the technique, the flavor options open up. These are a few of my personal go to variations that have wowed guests and me, every time I open the fridge.
- Chili garlic: Add 1/2 tsp chili flakes and a minced garlic clove for a spicy kick.
- Lemon herb: Replace vinegar with lemon juice and add chopped fresh dill or thyme.
- Black pepper and chive: Stir in cracked black pepper and finely chopped fresh chives for a savory finish.
- Smoked paprika: Just 1/4 tsp gives the cheese a deep, smoky flavor amazing on toast.
- Honey walnut: Mix in crushed walnuts and a drizzle of honey for a sweet savory twist.
These variations are a lot like what I do with savory crepes or cheesy breads keep the base solid, then let creativity take over.
How I Use This Cheese in My Kitchen
Once you make this cheese, you’ll find it sneaking into every meal. I’ve used it as a sandwich spread, a salad topping, and even stirred it into warm pasta for a creamy sauce. It’s smooth, flavorful, and adaptable.
- Morning toast: Spread it warm on toast with a drizzle of olive oil and tomato slices.
- Lunch wraps: Layer it into wraps with roasted vegetables and grilled chicken.
- Afternoon snack: Serve it with crackers and olives for a quick grazing plate.
- Dinner side: Crumble it over roasted potatoes or mix into grain bowls.
Honestly, this cheese does everything my favorite quick breads or yogurt cakes do adds comfort and homemade goodness to any dish.
How I Store and Reuse Leftover Whey
One of the things I used to pour down the sink until I realized its value is the leftover whey from cheese making. It’s the yellowish liquid you strain out after curdling the milk, and trust me, it’s liquid gold. Here’s how I keep and use it in my kitchen:
- Refrigerate it: Store it in a clean jar or bottle in the fridge for up to 5 days.
- Bread dough enhancer: Use whey instead of water in bread recipes like soft dinner rolls or crazy dough recipes it adds a subtle tang and extra nutrition.
- Soups and stews: Stir a splash into hearty recipes like vegetable soup or chili for extra depth.
- Smoothies: Add a few tablespoons to smoothies for protein and probiotic benefits.
- Pet food boost: Mix a bit into dog or cat food for extra nutrients (check with your vet first).
It’s a great way to reduce kitchen waste, just like saving carrot tops for broth or leftover bread for homemade breadcrumbs. Every drop counts.
Helpful Tips I Learned from Mistakes
I won’t lie my first batch of homemade vinegar cheese was clumpy and bland. But through practice, I figured out the tricks that make all the difference. These notes from my kitchen will help you avoid the same pitfalls:
| Problem | Why It Happens | What I Do Instead |
|---|---|---|
| Cheese is rubbery | Milk got too hot or boiled | Keep heat low and stop at a gentle simmer |
| Curds too small | Stirred too hard after vinegar | Stir gently, then let it sit undisturbed |
| Too salty | Salt added too early before tasting | Always taste before adding final salt |
| Curds didn’t form | Vinegar added too soon or milk was ultra pasteurized | Use fresh full fat milk and only add vinegar after simmering |
| Grainy texture | Curds drained too long without butter added | Add melted butter while curds are still warm |
These same principles apply to other delicate recipes like fluffy cheesecakes or moist vanilla cakes timing and temperature are everything.
How I Like to Serve This Cheese
This cheese has such a mellow and creamy profile that it plays well in both sweet and savory dishes. Depending on the flavor I’ve added, here are some of my go to serving ideas that always impress at the table:
- On breakfast toast: Spread it on toasted bread rolls with a drizzle of honey and thyme.
- As a dip: Mix it with Greek yogurt and lemon zest to create a tangy dip for veggie sticks or crackers.
- In sandwiches: Layer it inside a warm sandwich with roasted veggies or grilled chicken.
- As pasta topping: Crumble it over hot pasta just like feta or ricotta it melts beautifully.
- Appetizer plate: Serve it chilled with olives, roasted nuts, and crusty bread.
“There’s something magical about serving cheese you made yourself. Guests always ask for the recipe.” – @CurdAndCraft
Frequently Asked Questions About Homemade Cheese
Can I use lemon juice instead of vinegar?
Yes! Lemon juice is a great substitute and adds a slightly citrusy flavor to the cheese. Use the same quantity as vinegar.
What’s the best milk for homemade cheese?
Use full fat, non ultra pasteurized milk. The richer the milk, the creamier the cheese. Skim or low fat milk won’t work well.
Is this cheese like paneer or ricotta?
Yes, it’s very similar in texture to both. The vinegar separates the milk in the same way, creating soft curds you can shape or spread.
How long can I keep this cheese?
Store in the refrigerator in an airtight container for up to one week. For best texture and flavor, consume within 3-5 days.
Can I freeze homemade cheese?
You can, but the texture may become slightly crumbly once thawed. Wrap it tightly and thaw slowly in the fridge before using.
Well explained, thank you so much.
Amazing
thank you will try it in my kitchen