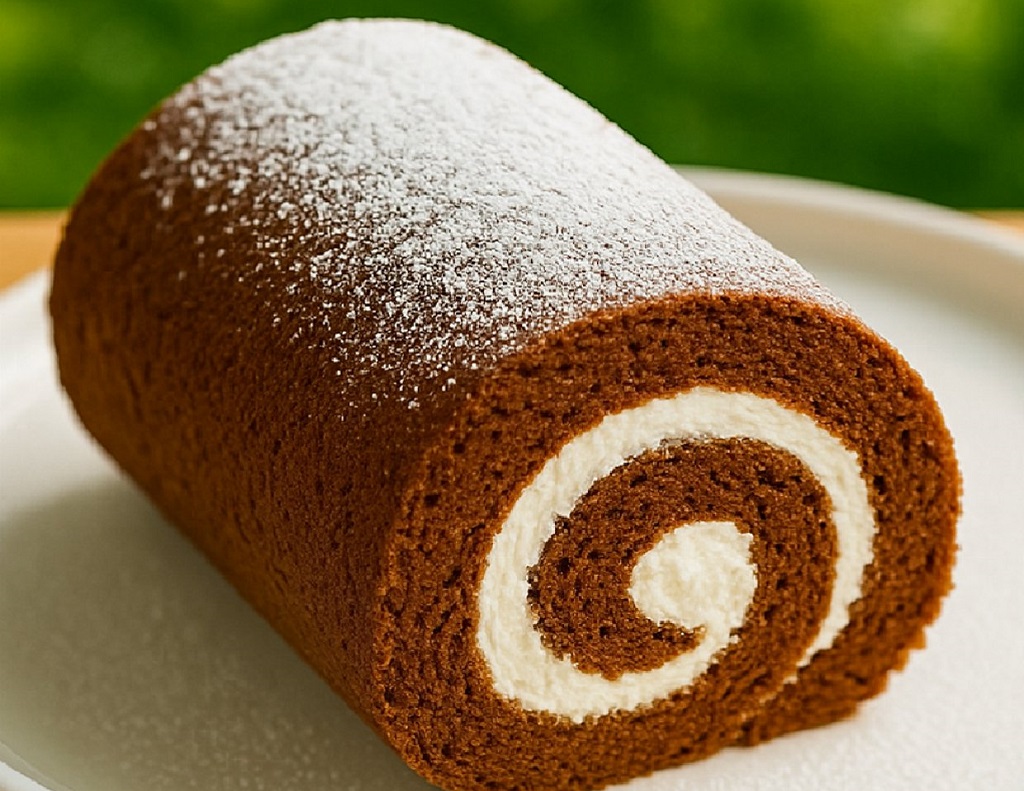
Chocolate Dream Roll Cake Recipe with Cream Filling is a delightful treat that combines rich chocolate flavors with a creamy filling. I have always enjoyed experimenting with different dessert recipes, from Double Chocolate Cola Layer Cake Recipe to Jalapeño Popper Stuffed Onion Rings Recipe.
Why This Recipe Works
Discover the key reasons why this Chocolate Dream Roll Cake Recipe with Cream Filling is a must try dessert:
Firstly, the rich chocolate sponge provides a decadent base, enhanced by the velvety cream filling.
Secondly, the delicate rolling process ensures a beautiful presentation and delightful texture.
Lastly, the combination of chocolate and cream creates a heavenly flavor profile that will satisfy any sweet tooth.
- Prepare the chocolate sponge: Incorporate high quality cocoa for rich flavor.
- Whip up the cream filling: Use chilled heavy cream for a light and fluffy texture.
- Assemble and roll the cake: Carefully spread the filling and roll the cake for an elegant finish.
Step by Step Recipe Guide
Ingredients
Let’s start by gathering the ingredients for the Chocolate Dream Roll Cake with Cream Filling:
The cake:
- 4 large eggs
- 1/2 cup (100g) granulated sugar
- 1/4 cup (30g) unsweetened cocoa powder
- 1/3 cup (40g) all-purpose flour
- 1/2 teaspoon baking powder
- 1/4 teaspoon salt
- 1 teaspoon vanilla extract
The filling:
- 1 cup (240 ml) heavy whipping cream
- 2 tablespoons powdered sugar
- 1 teaspoon vanilla extract
Dusting:
- Powdered sugar
Instructions
1- Prepare the Batter
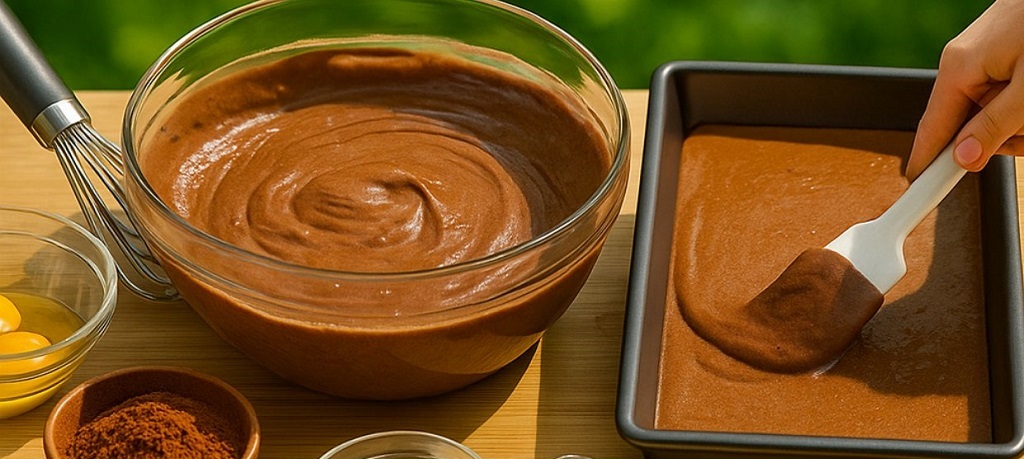
Preheat your oven to 350°F (175°C). Line a 10×15 inch jelly roll pan with parchment paper, leaving some overhang to lift the cake later. In a mixing bowl, beat the eggs and sugar together with an electric mixer on high speed for about 5 minutes, until the mixture becomes pale, thick, and fluffy. Add in the vanilla extract and mix briefly to combine.
2- Sift and Fold the Dry Ingredients
In a separate bowl, sift together the cocoa powder, flour, baking powder, and salt. Gradually fold the dry ingredients into the egg mixture using a spatula. Do this gently to avoid deflating the batter. Mix just until no dry streaks remain.
3- Bake the Cake
Pour the batter into the prepared jelly roll pan. Spread it evenly with a spatula, making sure it reaches all corners. Bake in the preheated oven for 10–12 minutes, or until the cake springs back when lightly touched in the center. Do not overbake.
4- Roll the Cake While Warm
Once baked, remove the cake from the oven. While still warm, lift it out of the pan using the parchment paper and place it on a clean kitchen towel. Dust the top with a bit of powdered sugar to prevent sticking, then roll the cake gently from the short end, towel and all. Let it cool completely while rolled to help it hold its shape.
5- Make the Cream Filling
In a chilled mixing bowl, whip the heavy cream with powdered sugar and vanilla extract using an electric mixer on high speed until stiff peaks form. Keep the whipped cream refrigerated until ready to use.
6- Fill and Re Roll the Cake
Carefully unroll the cooled cake. Spread the whipped cream evenly over the surface, leaving a small border around the edges. Gently roll the cake back up, this time without the towel. Use the parchment to help guide the roll if needed.
7- Finish and Serve
Place the rolled cake seam side down on a serving plate. Dust the top generously with powdered sugar before serving. For clean slices, refrigerate the cake for about 30 minutes to firm up slightly.
Preparing the Cake Batter
Combining the Ingredients
Start by sifting together the flour, cocoa powder, and baking powder to ensure a light and airy texture for the Soft Butter Cake Recipe. In a separate bowl, whisk the eggs and sugar until pale and fluffy.
Adding the Wet Ingredients
Gently fold the wet ingredients into the dry mixture to create a smooth batter, ensuring no lumps remain for a perfect texture similar to a Yellow Cupcake Recipe. Incorporate the milk gradually to maintain the right consistency.
Creating the Cream Filling
Preparing the Cream Filling
- Whip together cream cheese, powdered sugar, and vanilla extract until smooth.
- Gradually fold in whipped cream to create a light and airy texture.
- Ensure there are no lumps for a velvety consistency.
Assembling the Filling
- Spread the cream filling evenly over the chocolate cake layer.
- Layer on top Heavenly Cinnamon Rolls With Cream Cheese Frosting Recipe for extra decadence.
- Top with Creamy White Chocolate Custard Tartlets Recipe crumbles for added texture.
Baking and Rolling the Cake
Learn the techniques for baking the cake to perfection and expertly rolling it to create a stunning presentation.
Baking the Cake
| Ingredients | Measurement |
| Flour | 2 cups |
| Sugar | 1 cup |
Rolling the Cake
| Tools | Usage |
| Parchment Paper | For rolling the cake |
| Cake Board | For transferring the rolled cake |
Decorating the Cake
Creative Frosting Designs
Elevate the visual appeal of your Chocolate Dream Roll Cake Recipe with Cream Filling by exploring creative decoration ideas. Try using a piping bag to create intricate floral patterns or decorative swirls with the frosting. Incorporating edible flowers can add a pop of color and freshness to your cake Mini Caramel Flan Cups Recipe.
Chocolate Garnishes and Shavings
Enhance the beauty of your Chocolate Dream Roll Cake Recipe with Cream Filling by adding chocolate garnishes and shavings. Use a vegetable peeler to create delicate chocolate curls or dust cocoa powder through a stencil for a professional touch. Consider garnishing with caramelized nuts for an added crunch like in this Condensed Milk Flan Cake Recipe.
Serving and Storage Tips
Discover useful tips on serving your Chocolate Dream Roll Cake with Cream Filling and storing it to maintain its freshness.
Serving Tips:
- Allow the cake to sit at room temperature for 10-15 minutes before slicing to enhance the flavors.
- Pair each slice with a dollop of freshly whipped cream and a sprinkle of cocoa powder for an extra indulgent experience.
Transitioning to storage, you can extend the enjoyment of your Chocolate Dream Roll Cake with Cream Filling by following these guidelines:
1. Store the cake in an airtight container in the refrigerator to maintain its moistness.
2. To prevent the cake from sticking, place parchment paper between slices before storing.
| Storage Duration | Ideal Temperature |
|---|---|
| 2-3 days | Refrigerator (0-4°C) |
| 1-2 months | Freezer (-18°C or lower) |
Transitioning from serving to storage also helps in maintaining the cake’s freshness, ensuring every bite remains as delightful as the first. For more delicious dessert recipes, be sure to try our Homemade Pineapple Quick Bread Recipe, Lemon Oat No bake Cookies Delight Recipe, and Quick And Easy Beef Stir fry Noodles Recipe.
FAQ Section
What is the key ingredient in the Chocolate Dream Roll Cake Recipe with Cream Filling?
The key ingredient in the Chocolate Dream Roll Cake Recipe with Cream Filling is high quality dark chocolate. The rich and decadent flavor of the dark chocolate is complemented by the creamy filling, creating a delicious and indulgent dessert.
How long does it take to bake the Chocolate Dream Roll Cake?
The Chocolate Dream Roll Cake typically takes around 15-20 minutes to bake in the oven. Keep an eye on it and perform the toothpick test to ensure it is baked through and has the perfect texture.
Can I customize the filling in the Chocolate Dream Roll Cake?
Absolutely! You can customize the filling in the Chocolate Dream Roll Cake to suit your preferences. Consider adding different flavors such as strawberry, vanilla, or even nuts for a unique twist on this classic dessert.
Where can I find more dessert recipes similar to the Chocolate Dream Roll Cake?
If you enjoyed making the Chocolate Dream Roll Cake, you might also like these recipes: Sausage stuffed French Toast Roll ups Recipe, Crispy Crab Rangoon Egg Rolls Recipe, and Cheese Potato Bread In A Frying Pan. Try them out for a delightful culinary experience!
What is the best way to store leftover Chocolate Dream Roll Cake?
To store leftover Chocolate Dream Roll Cake, wrap it tightly in plastic wrap or store it in an airtight container. It can be kept in the refrigerator for up to 3-4 days, ensuring the cake stays fresh and maintains its delicious taste.
Don’t miss out on more delightful recipes! Follow the chef on Facebook.