
Fried cocoa Swivels recipe is a delightful dessert that will tantalize your taste buds. I discovered this recipe during my culinary training, and it quickly became a staple in my repertoire. Incorporating diverse flavors like in my Healthy No Bake Banana Oat Bars With Chocolate Recipe inspired by this bread elevates any meal.
Why This Fried Cocoa Swivels Recipe Works
Discover the secrets that make this fried cocoa swivels recipe a standout treat. When compared to Super Moist Chocolate Banana Cake Recipe, the unique swirled chocolate design adds a delightful visual appeal.
In contrast to a traditional loaf, this bread offers a different texture and flavor profile, similar to Fluffy Vanilla Sponge Cake Recipe With Milk And Sugar. Incorporating chocolate in a bread recipe provides a creative twist, unlike the conventional Simple Chocolate Cake Recipe.
Step by Step Fried Cocoa Swivels Recipe Guide
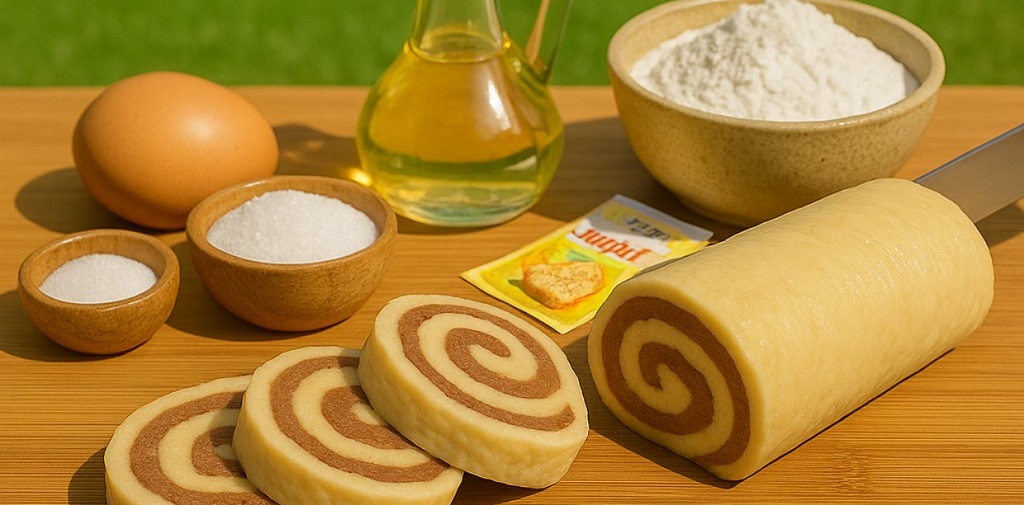
Ingredients
- 1 egg
- 140 g (0.7 cup) granulated sugar
- 70 ml (0.3 cup) vegetable oil
- 10 g vanilla sugar (or 1 tsp vanilla extract)
- 450 g (3.6 cups) all-purpose flour
- 170 ml (0.7 cup) warm water
- 10 g (2 tsp) baking powder
- 1 tablespoon unsweetened cocoa powder
- Pinch of salt
- Oil for frying
Instructions
- Make the Dough
In a large bowl, whisk together the egg, sugar, oil, vanilla sugar, and warm water until smooth.
Add the flour, baking powder, and salt gradually while mixing until a soft dough forms.
Knead until the dough is smooth and elastic, about 5-7 minutes. - Divide and Flavor
Split the dough into two equal parts.
Leave one plain (vanilla layer).
Add the cocoa powder to the second half and knead it in until fully blended and the color is even. - Roll and Shape
Roll out both dough portions into equally sized rectangles (about 0.5 cm thick).
Place the cocoa dough on top of the plain dough.
Roll tightly from the long side into a log.
Wrap and chill in the fridge for 20-30 minutes to make slicing easier. - Slice and Fry
Slice the chilled roll into 1-1.5 cm thick rounds.
Gently flatten each swirl slightly with your fingers.
Heat oil in a frying pan over medium heat.
Fry each piece for about 1-2 minutes per side until golden brown and puffed. - Drain and Serve
Place on paper towels to remove excess oil.
Serve warm or at room temperature optionally dusted with powdered sugar.
Preparation Tips
Preparation
Enhance your baking experience with these expert tips for preparing the fried cocoa swivels recipe. First, ensure all ingredients are at room temperature for better incorporation. Additionally, carefully follow the assembly steps to achieve the perfect chocolate swirled pattern.
Equipment Utilization
When preparing the fried cocoa swivels recipe, utilize a high quality mixer for efficient dough kneading. Furthermore, choose a non stick loaf pan to prevent sticking and ensure easy removal post baking. These tools enhance the baking process and yield excellent results.
The Art of Swiveling
The Swiveling Technique
- 1. Begin by rolling out the dough evenly on a floured surface.
- 2. Spread the chocolate filling generously, leaving a border around the edges.
- 3. Roll up the dough tightly into a log, sealing the edges.
Enhancing Your fried cocoa swivels
- 1. Elevate your baking skills with the Spinach Egg Cheese Bake Recipe.
- 2. Experiment with different fillings like in the Soft Butter Cake Recipe.
- 3. Dive into the world of savory bread with the No Knead Cheesy Bread (No Yeast).
Nutritional Information
Understand the nutritional value of each serving of the delectable fried cocoa swivels recipe. This indulgent treat contains a balance of essential nutrients. One serving provides 220 calories, 8g of fat, 32g of carbohydrates, and 4g of protein. Enjoy this sweet delight in moderation to savor its goodness.
| Nutrient | Amount Per Serving |
| Calories | 220 |
| Fat | 8g |
| Carbohydrates | 32g |
| Protein | 4g |
Decorating Ideas
Elevate the visual appeal of your fried cocoa swivels creation with these creative decorating ideas. Transform your loaf into a stunning centerpiece with a few simple steps:
- First Stage: Sprinkle powdered sugar on top for an elegant touch.
- Second Stage: Drizzle melted chocolate in a decorative pattern.
- Third Stage: Add a sprinkle of crushed nuts for a crunchy texture.
For more baking inspiration, check out our Fluffy Homemade Crescent Donuts Recipe, Sweetened Condensed Milk Bread, and Buttery Dinner Rolls.
Storage Recommendations
Proper Storage
After baking your delectable fried cocoa swivels, allow it to cool completely before storing to prevent moisture buildup. Wrap tightly in plastic wrap or store in an airtight container to maintain freshness.
Refrigeration Guidelines
If you anticipate not consuming the fried cocoa swivels within a few days, consider refrigerating it to prolong its shelf life. Before eating, allow the bread to come to room temperature for the best flavor and texture.
Servings and Presentation
Explore different serving suggestions and presentation styles to showcase your fried cocoa swivels recipe:
Serving Suggestions
| Option 1: Sliced with a dollop of whipped cream and fresh berries |
| Option 2: Toasted and served with a scoop of vanilla ice cream |
Presentation Styles
| Style 1: Plated on a rustic wooden board with a dusting of powdered sugar |
| Style 2: Arranged on a cake stand with drizzles of chocolate ganache |
Expert Troubleshooting
Common Dough Stickiness Issue
When encountering a sticky dough while preparing the fried cocoa swivels recipe, a common reason is Japanese milk bread didn’t mix properly. To resolve this, you can add a little extra flour gradually until the dough reaches the desired consistency.
Yeast Activation Problem
If your fried cocoa swivels recipe fails to rise, the issue may lie in the yeast activation. Check the expiration date of the yeast, and ensure water temperature is within the correct range. Use soft and fluffy homemade milk bread for reference on proper yeast activation techniques.
Frequently Asked Questions
What is the fried cocoa swivels recipe?
The fried cocoa swivels recipe is a delightful dessert that combines the rich flavors of chocolate with the light and fluffy texture of bread. This recipe involves swirling layers of chocolate filling into the dough, creating a beautiful marbled effect.
Can I customize the fried cocoa swivels recipe?
Absolutely! You can add your own twist to the fried cocoa swivels recipe by incorporating different flavors of chocolate or adding nuts for extra crunch. Feel free to experiment and make this recipe your own.
How long does it take to make the fried cocoa swivels?
The fried cocoa swivels recipe requires some time and patience, as the dough needs to rise properly before baking. On average, it can take around 2 to 3 hours from start to finish. However, the delicious results are definitely worth the wait.
Can I store the fried cocoa swivels for later?
Absolutely! Once baked, you can store the fried cocoa swivels in an airtight container at room temperature for up to 3-4 days. For longer storage, you can freeze the bread for up to a month and simply reheat when ready to enjoy again.
What are some other dessert recipes I can try?
If you enjoyed the fried cocoa swivels recipe, you might also like these delicious dessert recipes:
– Soft and Buttery Shortbread Biscuits Recipe
– Homemade Apple Slab Pie Recipe
– Easy Vanilla Pound Cake Recipe
Follow the chef on Facebook for more culinary delights. Follow on Facebook