Looking for a flavorful, chemical free way to enhance your soups and stews? After just a few easy steps, this homemade vegetable broth base will transform your meals with rich, natural flavor no additives needed!
As a chef who values real ingredients and vibrant flavors, I make these broth cubes almost weekly. They’re not only simple to prepare but also eliminate the need for processed bouillon cubes filled with preservatives. Let’s explore how to make your own natural base that’s both healthy and delicious!
Why You’ll Love These Vegetable Broth Cubes
This broth base is a staple in my kitchen. With just a cube, I can bring soups, sauces, grains, and stir fries to life all without reaching for anything artificial.
- Pure ingredients: Just vegetables, herbs, salt, and a little oil.
- Customizable: Use whatever fresh produce you have on hand.
- Freezer-friendly: Store them for months and use on demand.
- Budget-saving: Skip the pricey stock cartons.
- Time-saving: Instant flavor booster without chopping veggies daily.
Key Ingredients for Natural Vegetable Broth Cubes
Let’s take a closer look at the ingredients and what each one contributes to the flavor and nutrition of the broth:
| Ingredient | Purpose |
|---|---|
| Carrots (3) | Add sweetness and body to the broth. |
| Leek (1) | Gives a mild oniony depth with a delicate aroma. |
| Parsnips (2) | Contribute an earthy sweetness and creamy texture. |
| Parsley Roots (2) | Bring a distinct herbal and slightly peppery note. |
| Onion (1) | Classic base flavor that builds the foundation. |
| Garlic Cloves (2) | Enhance savory richness and aroma. |
| Turmeric (small piece) | Adds color and anti-inflammatory benefits. |
| Half a Kohlrabi | Contributes a gentle cruciferous flavor and fiber. |
| Half a Celeriac with leaves | Intensifies the broth’s umami and depth. |
| Fresh Parsley (handful) | Brightens and balances the base. |
| Sunflower Oil (splash) | Helps bind and cook the paste evenly. |
| Salt (80g) | Preserves and brings out natural flavors. |
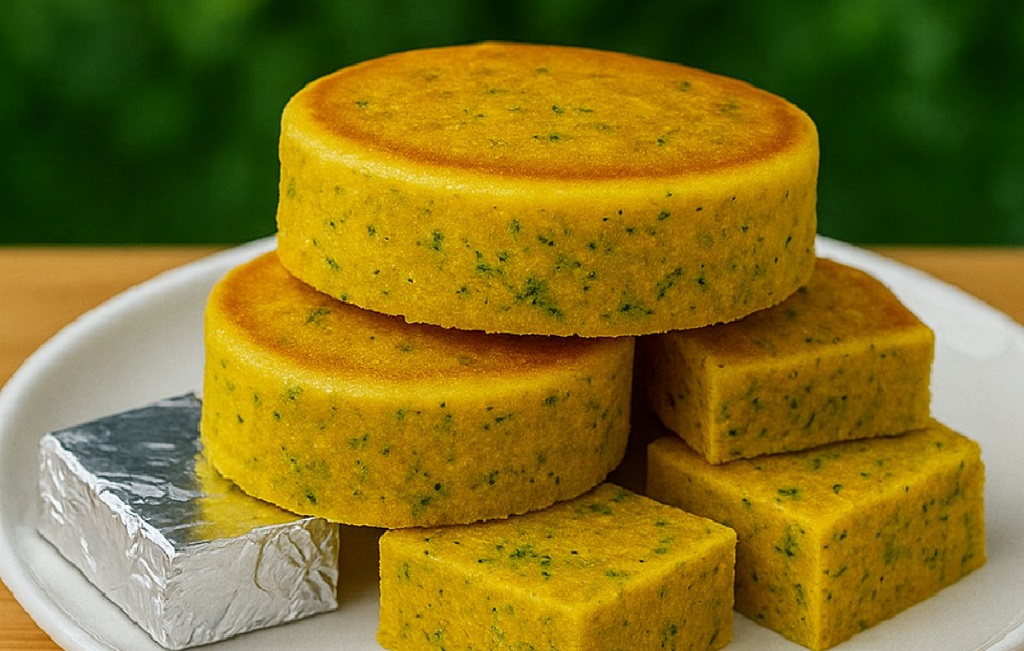
Step by Step to Make Natural Homemade Vegetable Broth Base Cubes
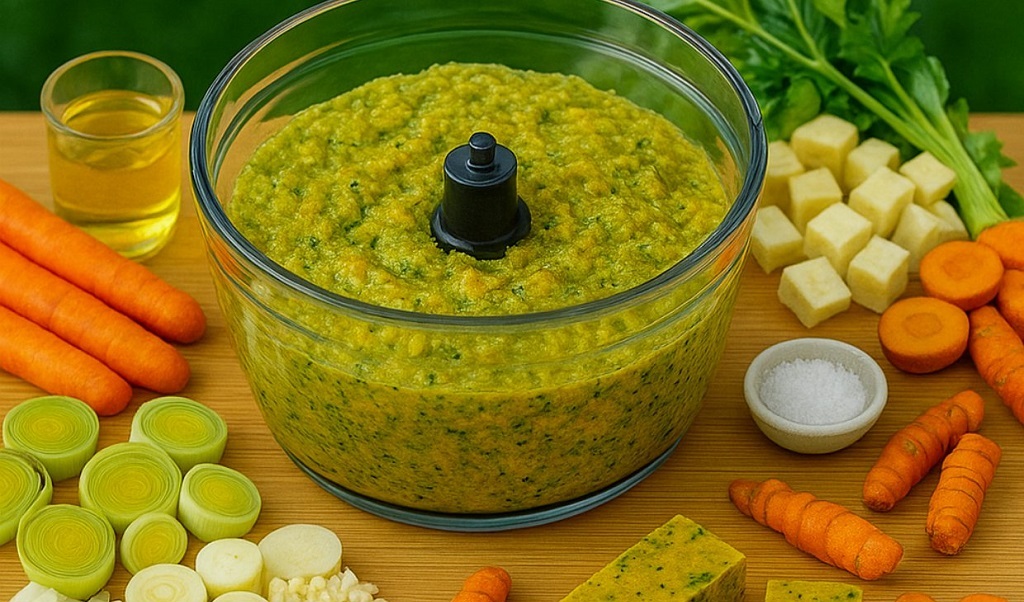
1: Chop the Vegetables
- Start by peeling the carrots, parsnips, parsley roots, turmeric, and celeriac.
- Chop all vegetables into rough chunks. This includes the leek, onion, garlic, and kohlrabi.
- Remove any tough parsley stems, but feel free to keep the soft ones they’re packed with flavor.
- Keep everything roughly the same size to ensure even blending.
2: Blend to a Paste
- Place all the chopped vegetables into a food processor.
- Add a generous splash of sunflower oil and the measured salt.
- Pulse in short bursts until the mixture forms a thick, grainy paste. Scrape the sides with a spatula as needed.
- The paste should be smooth enough to spoon but still hold structure.
3: Cook the Mixture
- Transfer the paste into a large non-stick pan or deep skillet.
- Set it over low heat and let it cook gently, stirring every few minutes.
- You’re not trying to brown the mixture, only to evaporate water and concentrate flavors.
- Cook for 20 to 30 minutes until the paste becomes denser, darker, and drier.
Tips for Perfect Broth Cubes Every Time
Over years of making this, I’ve found a few small tweaks that make a big difference in flavor and shelf life:
- Low and slow heat: Never rush the cooking step moisture needs time to escape naturally.
- Salt is key: It acts as both preservative and flavor enhancer. Don’t reduce it unless you plan to freeze the cubes long term.
- Consistency matters: If the final paste is too wet, it won’t mold or freeze well.
- Add herbs sparingly: Overloading with greens like parsley can turn the broth bitter.
- Label and date: Frozen cubes keep for up to 6 months. Make sure you know when you made them!
Why These Are Better Than Store Bought Cubes
“Ever flipped over a store-bought bouillon cube box? You’ll see things like monosodium glutamate, hydrogenated oils, and ‘flavor enhancers.’ With these homemade cubes, every ingredient is real and pronounceable.”
Beyond being clean and natural, these cubes are just more vibrant in flavor. They capture the sweet-earthy essence of real vegetables in a way that powdered stock never can. Plus, they’re allergen friendly, gluten free, and totally adaptable to your family’s dietary needs.
Storage and Shelf Life
- Refrigerator: Store the cubes in an airtight jar for up to one week.
- Freezer: For long term storage, freeze cubes in silicone molds or wrap them individually with parchment. Keep in a freezer-safe bag or container for up to 6 months.
Whenever you need broth, just drop one or two cubes into boiling water and stir. No need to defrost beforehand.
Recipe Yield and Nutrition
This recipe yields roughly 15-20 cubes depending on the size of your molds. Each cube is potent enough to flavor 1 to 1.5 cups of water for brothy uses like:
- Cooking grains like rice or quinoa
- Making light soups
- Adding to sauces or gravies
- Boosting the flavor of sautéed vegetables
And the best part? There are zero preservatives, zero artificial ingredients, and full control over the salt levels if you need to adjust it to dietary needs.
Creative Ways to Use Your Broth Cubes
Once you have these vegetable broth cubes on hand, the possibilities in the kitchen open wide. They’re not just for traditional soup! Here’s how I love to use them to amplify flavor in everyday meals:
- Quick Broth: Dissolve 1 cube in a cup of hot water for instant sipping broth perfect on cold days or when feeling under the weather.
- Grain Booster: Drop a cube into the pot while cooking rice, quinoa, or couscous to infuse the grains with flavor.
- Vegan Risotto: Use the cubes as a base for a creamy, dairy free risotto that still has depth and umami.
- Flavor Base for Stir Fries: Add a cube to the pan when deglazing with water or a splash of white wine.
- Instant Soup: Combine a cube with boiling water, leftover veggies, and a handful of noodles or lentils for a fast and hearty lunch.
- Sauce Enhancer: Blend a bit of the paste (or a melted cube) into pasta sauce, curry, or gravy to deepen the flavor without extra salt.
“These cubes act like culinary gold. One little square has the power to turn plain water into a comfort-rich, soul-soothing liquid.”
How to Customize the Recipe for Your Preferences
The beauty of this recipe lies in its adaptability. While the original version is balanced and well-rounded, there’s always room for you to personalize the flavor profile. Here are some thoughtful substitutions and enhancements:
Substitute Vegetables
- Swap celeriac with celery stalks if unavailable, but reduce the quantity since stalks have higher water content.
- Replace parsnips with sweet potatoes or rutabaga for a milder, sweeter base.
- Add mushrooms for more umami depth, especially if you plan to use the cubes in meatless dishes.
Change the Herbs
- Use dill or thyme in place of parsley for a different herbal note.
- Add bay leaf powder or dried rosemary during the cooking stage for more complexity.
Adjust the Texture
- If you prefer a very smooth broth, blend the paste longer and strain the final broth after dissolving a cube in hot water.
- If you like a rustic broth, leave the paste slightly chunkier for more vegetable texture when dissolved.
Are These Cubes Healthy?
Absolutely and far more so than store-bought options. Let’s look at a few reasons why these homemade broth cubes win on the health front:
- No MSG: Many commercial bouillon cubes contain monosodium glutamate, which can cause headaches or bloating in sensitive individuals.
- Lower Sodium Control: While this recipe uses salt for preservation, you control the amount, and it’s far less than the average packaged cube.
- No hydrogenated oils: You’re using sunflower oil natural and clean instead of artificial binders or oils.
- Real vegetables only: No starches, sugars, or fillers. Just roots, herbs, and aromatic alliums.
- Preserved naturally: Salt and gentle cooking keep the paste fresh without any chemicals.
These cubes are ideal for vegan, vegetarian, and gluten free diets, and they work beautifully in low histamine or allergy-aware kitchens.
Chef’s Commentary: Why I Stopped Buying Broth
“I used to keep shelves full of broth cartons. Then I realized I was paying for water, packaging, and preservatives. Now I use these cubes, and they’re better in every way.”
When I first tested this recipe in my own kitchen, I was skeptical about whether such a small cube could deliver flavor like store bought stock. But once I sautéed a bit of garlic in olive oil, added hot water, dropped in a cube, and smelled that aroma I was sold. My homemade soups never tasted so fresh.
Over time, I’ve refined the process, adjusted the vegetable balance, and tried dozens of versions. This one is the perfect mix. It has just the right earthy base, balanced sweetness from carrots and parsnips, and a smooth richness from the oil and onion.
Best Equipment to Use
While you can make this recipe with basic tools, the right equipment can improve consistency and efficiency. Here’s what I recommend from years of testing:
- Food Processor: A high powered processor cuts the prep time in half and ensures a smooth blend. A blender can work, but tends to need more scraping and liquid.
- Non-stick Deep Skillet or Dutch Oven: You need a wide surface for evaporation and a coating that resists sticking as the paste thickens.
- Silicone Molds: Ice cube trays work too, but flexible molds make it easier to pop the cubes out cleanly without cracking.
- Spatula: A firm rubber or silicone spatula helps you spread the paste into molds and stir without damaging your pan.
- Glass Jars: For storing refrigerated cubes, wide mouth jars are best. For freezer storage, use labeled zip-top freezer bags or airtight containers.
Pro Tips for Freezing and Using
Want to get the most out of every batch? Here are my top freezer tips after making dozens of rounds of broth paste:
- Freeze in single-use portions: Make your molds hold just 1-2 tablespoons of paste per cube for easy, no-waste use later.
- Label everything: Write the date and contents on your bags or jars. Even great broth can get lost in a full freezer.
- Don’t thaw first: These cubes are meant to go straight into boiling water or a hot pan no defrosting needed.
- Use within 6 months: After that, the aroma and flavor will begin to fade, even if they’re still safe to use.
“Think of these cubes like your own kitchen-made stock concentrate made once, used for months.”
Bonus Tip: Make a Double Batch
If you have a big family or cook often, you’ll quickly burn through one tray of broth cubes. I always recommend making a double or triple batch and dividing it across multiple trays or containers.
The cooking time remains the same, but you’ll save prep time later and avoid the temptation of buying packaged stock again. Plus, if you’re gifting food to friends, a jar of homemade broth cubes makes a unique and thoughtful gift!
How Many Broth Cubes Should I Use?
In my kitchen, I generally use one cube for every 1 to 1.5 cups of water, depending on the intensity of flavor I want. If you’re cooking something that needs a more delicate taste, like rice or couscous, one cube per two cups works well. For hearty soups or gravies, go with a 1:1 ratio.
And remember, since these cubes already contain salt, adjust any additional seasoning accordingly. Taste as you go that’s the best advice any chef can give!
Can I Add This Paste Directly Into Dishes?
Yes, absolutely. In fact, sometimes I skip the step of dissolving in water entirely and simply stir a cube or spoonful of the paste directly into:
- Sautéed onions and garlic (for instant flavor base)
- Tomato sauces
- Grain pilafs and risottos
- Boiling pasta water for added aroma
The paste melts into warm liquids and spreads its flavor quickly. It’s flexible enough to adapt to any dish where broth or seasoning is welcome.
Can I Make This Low Sodium?
Yes but with a caveat. The salt in this recipe doesn’t just flavor the broth, it also preserves it. If you reduce the salt, make sure to freeze all cubes rather than refrigerating them.
Here are two ideas for low sodium versions:
- Reduce salt by 50% and increase the freeze time to keep them solid and fresh.
- Leave out the salt entirely and store in small frozen spoonfuls, using them immediately upon thawing and salting your dish to taste.
“The joy of homemade broth is that you’re in total control. Salt, ingredients, herbs it’s all up to you.”
FAQs
What are vegetable bouillon cubes made of?
Commercial cubes are made from dehydrated vegetables, salt, flavor enhancers like MSG, and preservatives. Homemade versions like this recipe use only real vegetables, herbs, salt, and oil no chemicals or artificial additives.
Are homemade broth cubes healthier than store bought?
Yes. Homemade broth cubes are free from processed ingredients and artificial preservatives. You also control the salt and avoid additives like monosodium glutamate or yeast extract, making them better for your health.
Can I use vegetable scraps to make broth cubes?
Yes! While this recipe uses full vegetables for balance and consistency, you can also include clean scraps like carrot peels, onion ends, and celery leaves. Avoid bitter or overly fibrous parts like cabbage cores or potato skins.
How long do homemade vegetable broth cubes last?
Refrigerated cubes last about 7 days in a sealed jar. Frozen cubes last up to 6 months if stored in airtight containers or freezer bags. Always label with the date!
What’s the difference between broth cubes and stock?
Stock is a liquid made by simmering bones and vegetables for hours. Broth cubes are concentrated pastes that dissolve into water, creating instant flavor similar to broth or stock just much faster and more convenient.
For more daily clean-eating recipes and kitchen hacks, follow us on Facebook we share fresh ideas every day!