Looking for a quick, savory snack that satisfies your cheese cravings and sneaks in some greens? These Spinach Dip Cheese Crisps are baked to golden perfection and loaded with all the creamy, cheesy flavor of your favorite spinach dip just in crispy, bite-sized form. Whether you’re low-carb, gluten-free, or just hungry for something cheesy, these crisps are always a win.

Why Spinach Dip Cheese Crisps Are So Addictive
Imagine the flavor of classic spinach dip creamy, garlicky, cheesy goodness melted into crisp little rounds that you can eat like chips. That’s exactly what these are. They deliver crunch on the edges, soft cheesy middles, and just enough spinach to make them feel wholesome.
“They’re the kind of snack you can’t stop grabbing. And the best part? They’re baked, not fried.”
I often whip these up for gatherings, game day snacks, or even just to enjoy with a bowl of soup. They’re fast, freezer-friendly, and crowd-approved even among picky eaters and spinach skeptics.
Simple Ingredients, Bold Flavor
- Frozen chopped spinach: Convenient and packed with nutrients. Just be sure it’s well-drained to avoid soggy crisps.
- Mozzarella cheese: Brings that perfect melt and stretch while holding the crisps together.
- Parmesan: Adds bold flavor and helps crisp the edges.
- Cream cheese: Softens the texture and adds creaminess like a real dip.
- Garlic & onion powder: Simple seasoning that delivers big taste.
- Red pepper flakes (optional): For a subtle kick of heat.
Want more low-carb cheese snacks? Try our Cheesy Potato Snack Bites or Crispy Cabbage Egg Rounds both crispy, flavor-packed, and made with real ingredients.
Tools You’ll Need
- Baking sheet
- Parchment paper or silicone mat
- Mixing bowl and spoon
- Clean kitchen towel or paper towels for draining spinach
Step by Step to Make Spinach Dip Cheese Crisps
1: Prep Your Oven and Pan
- Preheat your oven to 375°F (190°C).
- Line a baking sheet with parchment paper or a silicone baking mat to ensure easy release and even browning.
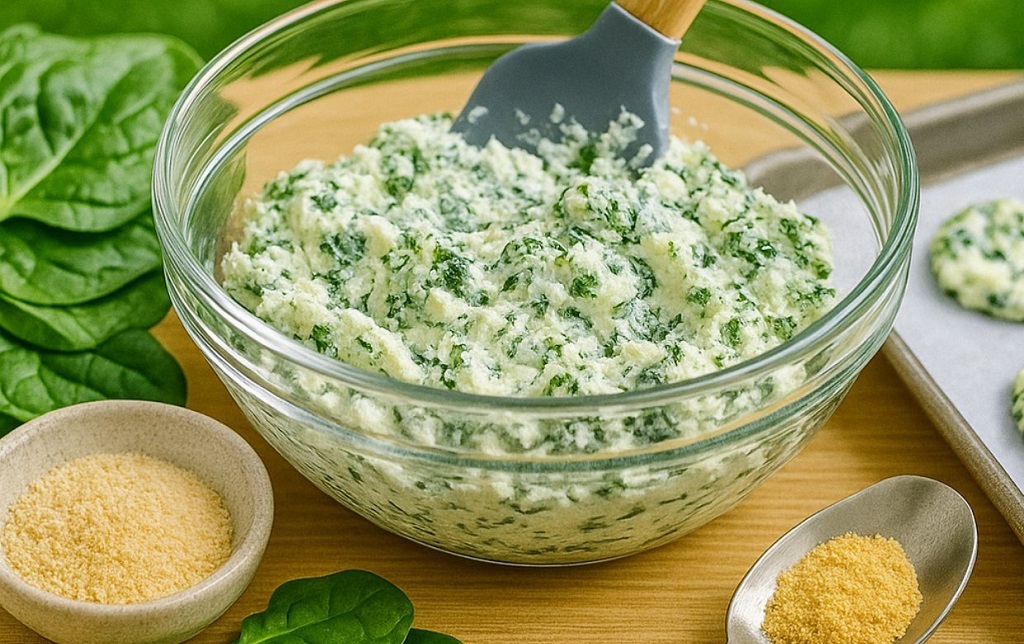
2: Drain the Spinach Thoroughly
- Take 1 cup of thawed frozen chopped spinach and wrap it in a clean kitchen towel or a few layers of paper towel.
- Squeeze firmly over the sink to remove as much excess moisture as possible. This is key to getting crisp edges instead of soggy bottoms.
3: Mix the Cheese Base
- In a mixing bowl, combine the drained spinach with 1 cup of shredded mozzarella, ½ cup grated Parmesan, and 4 oz of softened cream cheese.
- Add ½ teaspoon garlic powder, ¼ teaspoon onion powder, and a pinch each of salt and pepper.
- Optional: Mix in a pinch of red pepper flakes for gentle heat.
- Stir everything together until the mixture is fully blended and uniform.
4: Shape and Space the Crisps
- Use a tablespoon or small cookie scoop to portion about 1 to 1½ tablespoons of the mixture onto the prepared baking sheet.
- Flatten each mound gently with the back of a spoon to form round discs approximately 2-3 inches wide.
- Leave space between each one to allow for spreading as they bake.
5: Bake to Perfection
- Place the tray in the oven and bake for 12-15 minutes.
- Watch for the edges to turn golden brown and the centers to bubble slightly. That’s the sweet spot for crispiness and melt.
6: Cool Before Serving
- Let the crisps rest on the baking tray for 5-10 minutes before serving. They will firm up as they cool and be easier to lift.
- Use a thin spatula to gently remove them from the parchment or mat and transfer to a serving plate.
I like to serve these warm right off the tray, but they’re also great at room temp. Dip them in marinara, ranch, or a garlicky yogurt sauce if you want a flavor boost.
For a more filling low-carb option, try pairing them with a bowl of Spinach & Feta Rolls or enjoy them on the side of a warm vegetable soup.
Storage, Reheating, and Expert Tips
One of the best things about these Spinach Dip Cheese Crisps besides their flavor is how well they store and reheat. Whether you’re meal prepping or saving a few extras for later, they hold up better than you’d expect.
- Refrigerator: Store cooled crisps in an airtight container for up to 4 days. Place parchment paper between layers to prevent sticking.
- Freezer: Flash freeze them on a tray first, then transfer to a zip-top freezer bag. They’ll keep for up to 2 months. Reheat directly from frozen.
- Reheating: To bring back their crisp texture, place them on a baking sheet in a 350°F (175°C) oven or toaster oven for 5-7 minutes. Avoid the microwave, as it softens the edges.
These also pack well for school or office lunches when you want a savory low-carb option that’s a little more exciting than boiled eggs or plain cheese sticks.
FAQs
Can I use fresh spinach instead of frozen?
Yes! Just finely chop and sauté it first to reduce moisture. You’ll need about 2 cups fresh to equal 1 cup frozen.
Can I make them dairy-free?
You can try dairy-free cheeses, though they may not crisp as much. Use firm varieties and a plant-based cream cheese substitute for best results.
Can I air fry them?
Absolutely. Air fry at 375°F (190°C) for about 8-10 minutes. Be sure to use parchment or a liner to avoid sticking through the basket holes.
How do I keep them from spreading too much?
If your mixture is too soft or warm, chill it briefly before baking. Also, make sure your spinach is drained well it’s the most common culprit!
What dips go well with these crisps?
Ranch, tzatziki, marinara, or even a simple sour cream and herb dip all pair perfectly with the cheesy, garlicky flavor.
Follow us on Facebook for quick snack recipes, cheesy creations, and more healthy bites that satisfy every craving!
Save This Recipe
Enter your email below and we'll send the link straight to your inbox. You'll also get fresh baking recipes each week.
More From Cookies & Bars


You Might Also Like


Bold Flavors Easy Steps Every Time. Tank you