
Fresh orange zest, sweet raisins, and a delicate sugar crust make these orange raisin scones a lovely choice for breakfast or afternoon tea. Cold cultured buttermilk and frozen grated butter are central to the dough, while a fresh orange glaze provides the final citrus finish.

This recipe makes eight generous triangular scones. The complete ingredient measurements and start-to-finish instructions are in the Recipe Card below. The additional guidance here helps you recognize the right dough texture, avoid common shaping problems, and judge doneness with confidence.
Orange Raisin Scones
Eight large triangular orange raisin scones made with frozen grated butter, cultured buttermilk, fresh orange zest and juice, raisins, a sparkling sugar crust, and a post-bake orange glaze.
Ingredients
- 2 1/2 cups Unbleached all-purpose flour 300 g; spooned into the measuring cup and leveled; dry and at room temperature. Measure the full amount for the dough. A very light additional dusting of flour from the work surface is acceptable for shaping.
- 1/4 cup Granulated white sugar 50 g; dry and free of clumps; for the dough.
- 1 tablespoon Double-acting baking powder 14 g; fresh and lump-free.
- 1/2 teaspoon Baking soda 2.5 g; dry and lump-free.
- 1/2 teaspoon Fine sea salt 3 g; fine grind.
- 2 teaspoons Fresh orange zest 4 g; packed, finely grated from the bright orange outer peel only; avoid the bitter white pith. For the dough.
- 8 tablespoons Unsalted butter 113 g, equivalent to 1 US stick; frozen solid for at least 2 hours at 0°F (-18°C) or colder. Grate through the large holes of a box grater immediately before incorporation. Freezing is advance ingredient preparation and is not included in the 69-minute recipe timeline.
- 1/2 cup Cultured buttermilk 120 mL; well-shaken and refrigerator-cold, approximately 35–40°F (2–4°C); for the dough.
- 3 tablespoons Fresh orange juice 45 mL; freshly squeezed, strained to remove seeds and pulp, and refrigerator-cold; for the dough.
- 1 large egg Large chicken egg Approximately 50 g without the shell; refrigerator-cold; for the dough.
- 1/2 cup Seedless raisins 80 g; dark or golden raisins, dry and pliable, with sticky clusters separated. For folding into the dough.
- 1 large egg Large chicken egg Approximately 50 g without the shell; beaten thoroughly until uniform; reserved exclusively for the pre-bake egg wash.
- 1 teaspoon Cultured buttermilk 5 mL; for whisking into the pre-bake egg wash.
- 2 tablespoons Granulated white sugar 25 g; for sprinkling evenly over the egg-washed scone tops before baking.
- 1/2 cup Confectioners' sugar 60 g; sifted to remove lumps; for the orange glaze.
- 1 tablespoon Fresh orange juice 15 mL; freshly squeezed, strained, and at room temperature; for the orange glaze.
- 1 teaspoon Fresh orange zest 2 g; finely grated from the bright orange outer peel; for the orange glaze.
Instructions
- Before starting the timed recipe, make sure the unsalted butter has been frozen solid for at least 2 hours at 0°F (-18°C) or colder. Keep it frozen until the moment it is grated. Have the dough buttermilk, orange juice, and egg cold. This advance freezing period is not included in the stated preparation or total time.
- Position an oven rack in the center of the oven and preheat to 400°F (204°C) using conventional bake mode without a convection fan. Line a heavy 13-by-18-inch half-sheet pan with unbleached parchment paper. Allow the oven to reach its set temperature before baking.
- In a large mixing bowl, combine the all-purpose flour, dough sugar, baking powder, baking soda, fine sea salt, and 2 teaspoons of fresh orange zest. Rub the zest into the dry mixture with clean fingertips for approximately 30 seconds to distribute the citrus oils. The mixture should look evenly combined, with no visible clumps of leavening.
- Remove the frozen butter from the freezer and immediately grate it through the large holes of a box grater onto parchment. Transfer the shreds directly into the flour mixture. Toss gently with a fork or clean fingertips for 20–30 seconds, until the butter ribbons are separate and lightly coated with flour. Do not rub, mash, or smear the butter into a paste.
- In a medium bowl, whisk together the 1/2 cup cold cultured buttermilk, 3 tablespoons cold orange juice, and the cold dough egg until the mixture is smooth and evenly blended.
- Pour the liquid mixture into the butter-flour mixture all at once. Use a silicone spatula or fork to lift and fold the ingredients gently, approximately 15–20 strokes, until most of the dry flour is moistened and a loose, shaggy dough forms. Add the raisins and fold 3–4 more times to distribute them. Stop mixing before the dough becomes smooth or elastic.
- Turn the shaggy dough onto a lightly floured work surface. Gently press the loose pieces together into a cohesive mass. If loose crumbs remain, fold the dough in half once and press lightly rather than kneading. Pat into one even round disk approximately 8 inches (20 cm) in diameter and 3/4–1 inch (2–2.5 cm) thick. Tuck any raisins exposed on the top surface gently beneath the dough to reduce scorching.
- Lightly flour the straight edge of a metal bench scraper or long chef's knife. Cut straight down through the center of the dough disk without sawing or dragging the blade. Make the remaining radial cuts to divide the round into eight equal triangular wedges. Lift the blade cleanly between cuts.
- Using the bench scraper, transfer the eight wedges to the prepared parchment-lined half-sheet pan. Arrange them in a staggered pattern with at least 2 inches (5 cm) of space between the wedges, including their pointed ends. Keep the cut sides exposed and avoid pressing the wedges back together.
- In a small dish, whisk the separate finishing egg with 1 teaspoon cultured buttermilk until uniform. Lightly brush the tops of all eight wedges, keeping the wash off the cut sides. Sprinkle the 2 tablespoons granulated sugar evenly over the brushed tops. This forms the pre-bake sparkling sugar finish; the orange glaze is applied only after baking and cooling.
- Place the pan on the center oven rack and bake at 400°F (204°C) in conventional mode for 18–20 minutes, with 19 minutes as the nominal recipe-card cook time. Rotate the baking sheet 180 degrees after 12 minutes. Begin checking at 18 minutes. The scones are ready when the tops and corners are deep golden-brown, the sides are pale-creamy with visible expansion fissures and feel firm, the bases are dry and golden, and a wooden toothpick inserted into the center of the thickest wedge comes out clean without raw batter. Use the physical doneness cues rather than the timer alone.
- Remove the pan from the oven and leave the baked scones undisturbed on the warm baking sheet for 5 minutes. Then transfer them carefully with a spatula to a wire cooling rack. Allow another 20 minutes of cooling before applying the glaze. The scones should be at room temperature before glazing; if they remain warm, allow additional cooling time beyond the nominal estimate.
- While the scones cool, whisk the sifted confectioners' sugar, 1 tablespoon room-temperature fresh orange juice, and 1 teaspoon finely grated orange zest in a small bowl until smooth, opaque, and free of dry sugar pockets. Prepare the glaze during the cooling period so this mixing time does not add a separate waiting period.
- Once the scones have cooled, drizzle the orange glaze over their tops with a spoon or whisk. Leave the glazed scones undisturbed at room temperature for another 10 minutes, or until the glaze forms a set surface. This setting period follows the 5-minute pan rest and 20-minute rack cooling; it is not counted as concurrent with the pre-glaze cooling. Serve one glazed wedge per portion.
Notes
- Freeze the unsalted butter for at least 2 hours at 0°F (-18°C) or colder before beginning. This advance freezing is excluded from the 69-minute total.
- Frozen butter should remain in separate, lightly flour-coated ribbons after 20–30 seconds of gentle tossing.
- Stop folding when the dough is rough and shaggy. Do not knead it smooth.
- Shape one disk approximately 8 inches (20 cm) across and 3/4–1 inch (2–2.5 cm) thick. Cut eight wedges straight down and space them at least 2 inches (5 cm) apart.
- Tuck exposed surface raisins beneath the dough to reduce scorching.
- Keep the egg wash off the cut sides.
- Check doneness using golden tops, set fissured sides, dry golden bases, and a clean toothpick.
- Cool for 5 minutes on the pan and another 20 minutes on a rack before glazing. Allow approximately 10 additional minutes for the glaze to set.
- Golden raisins or sultanas may replace dark raisins using the same 1/2-cup measure.
- Dried Zante currants may replace raisins by the same 1/2-cup volume; their weight should not be assumed identical.
- For a cultured-buttermilk alternative, add 1 1/2 teaspoons (7.5 mL) fresh lemon juice or strained orange juice to a measuring cup, then add whole milk to the 1/2-cup (120 mL) mark. Stir, stand for 5 minutes, and chill before use. Its thickness, flavor, and dough behavior may differ from cultured buttermilk.
- For the approved unglazed afternoon-tea variation, omit the orange glaze and serve warm or at room temperature with clotted cream, orange marmalade, and hot black tea. Keep the dough, pre-bake finish, and baking instructions unchanged.
What Makes These Orange Raisin Scones Different?
The defining features are frozen grated butter, an egg-enriched cultured-buttermilk dough, fresh orange flavor, and two separate finishes. Each has a particular role in the approved recipe.
Frozen Grated Butter
The butter should remain in distinct, lightly flour-coated ribbons rather than disappearing into a smooth paste. This is an important visual checkpoint because greasy patches or large smeared clumps are not the intended condition.
For a related but distinct buttermilk-based recipe, explore our homemade buttermilk biscuits. They offer another approach to baking with buttermilk without being interchangeable with these scones.
Cold Buttermilk and Fresh Orange
Cultured buttermilk supplies the dough’s dairy liquid and acidity, which works with the baking soda in the approved formula. Fresh orange zest contributes citrus oils, while orange juice adds further orange flavor. Raisins provide pockets of dried fruit throughout the wedges.
Use only the brightly colored outer orange peel when zesting. The white pith underneath is bitter. Keep the dough liquids cold, and separate sticky raisin clusters so the fruit can be distributed without excessive mixing.
Two Distinct Finishes
The sparkling sugar crust is a pre-bake finish made with an egg-and-buttermilk wash and granulated sugar. The confectioners’ sugar and orange glaze is applied only after cooling. These finishes have different purposes and should not be combined into one stage.
Before You Start: Equipment and Timing
A box grater, citrus zester, mixing bowls, whisk, fork or silicone spatula, straight-edged bench scraper or chef’s knife, pastry brush, heavy 13-by-18-inch half-sheet pan, parchment paper, and wire cooling rack are useful for this recipe. Have a wooden toothpick or slender skewer available for checking the thickest wedge.
Plan ahead: The butter needs at least 2 hours of advance freezing at 0°F (-18°C) or colder. This period is excluded from the standard 69-minute total. The nominal timeline includes 15 minutes of preparation, approximately 19 minutes of baking, and 35 minutes of cooling and glaze setting.
The glaze can be prepared while the baked scones cool. The final setting period occurs after the pre-glaze cooling, not at the same time.
Visual Checkpoints for Orange Raisin Scones
The Recipe Card contains the complete chronological method. Use these additional checkpoints to recognize whether the dough and shaped wedges match the approved preparation.
Recognizing Properly Incorporated Butter
The mixture should show separate butter shreds with a light coating of flour. It should not look greasy, heavily clumped, or paste-like. Avoid continuing to handle the butter once this condition has been reached.
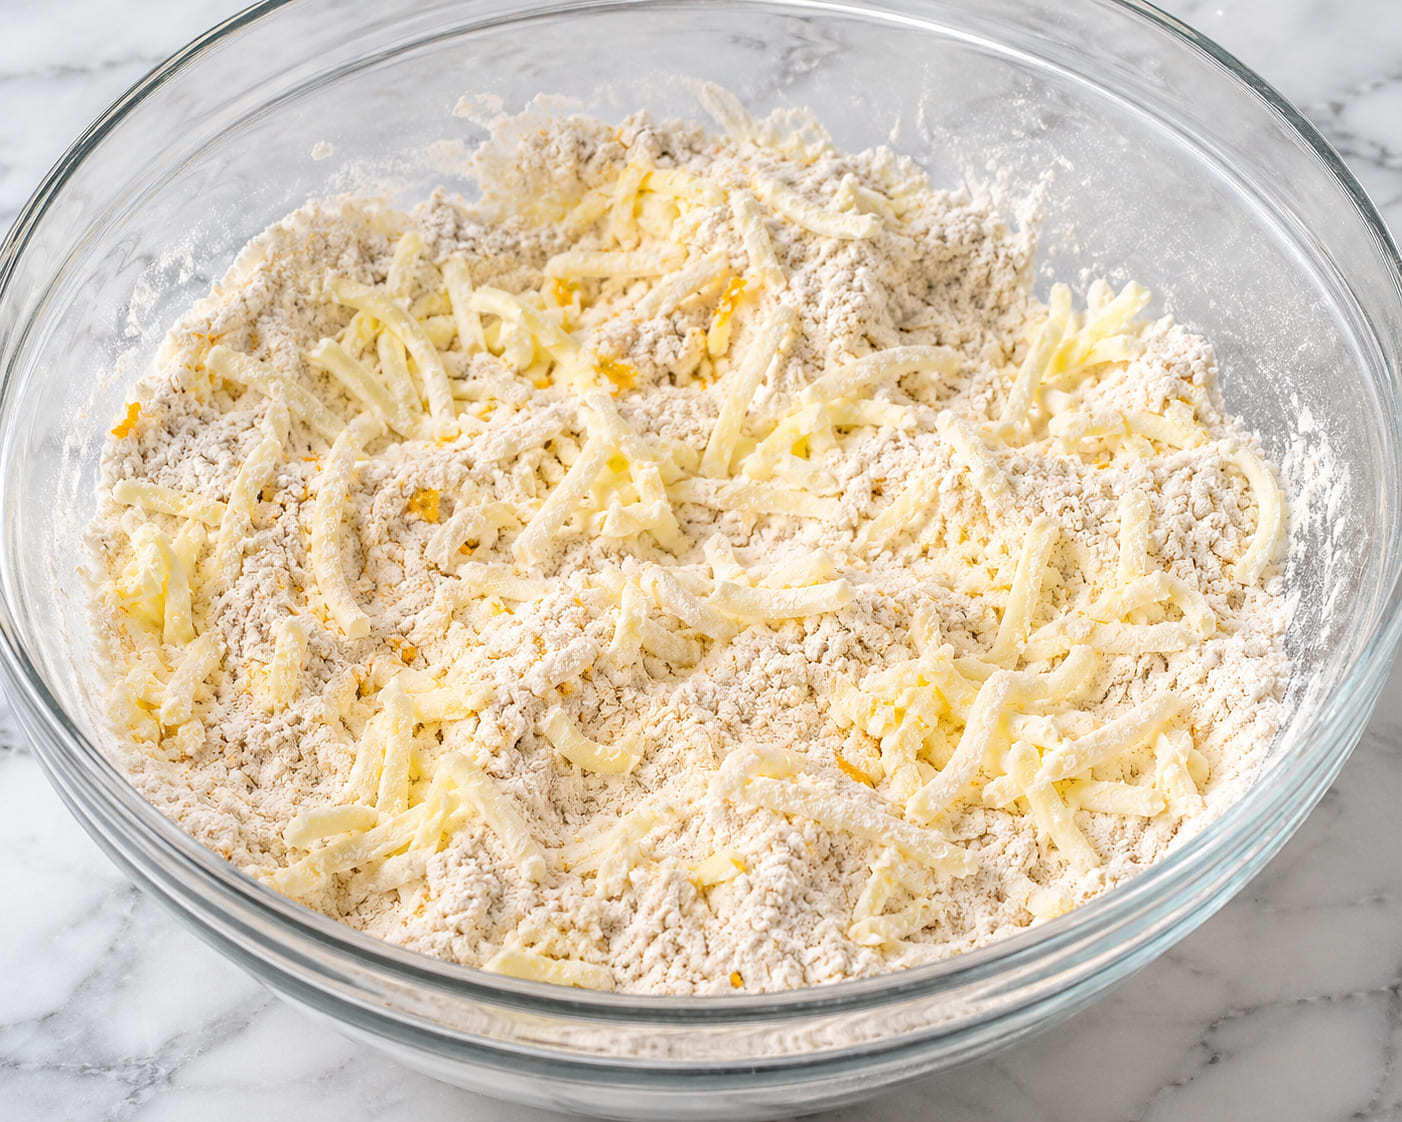
Visual checkpoint: Individual flour-coated ribbons remain visible. If the mixture begins to smear, further rubbing is not the solution. The intended preparation uses a brief, gentle incorporation rather than prolonged handling.
Knowing When the Dough Is Mixed Enough
A loose, rough, shaggy dough is expected. Most of the dry flour should be moistened, and the raisins should be distributed, but the dough should not be smooth or elastic.
Common concern: An uneven appearance does not automatically mean the dough needs more mixing. Gentle pressing is preferable to repeated kneading. If loose crumbs remain during shaping, the approved method permits one light fold.
Checking the Shape Before Baking
The approved shape is a single round approximately 8 inches (20 cm) across and 3/4–1 inch (2–2.5 cm) thick, divided into eight distinct triangular wedges.
Look for clean, straight cut edges rather than dragged or compressed sides. The wedges should remain separate on the baking sheet, with at least 2 inches (5 cm) between them, including their pointed ends.
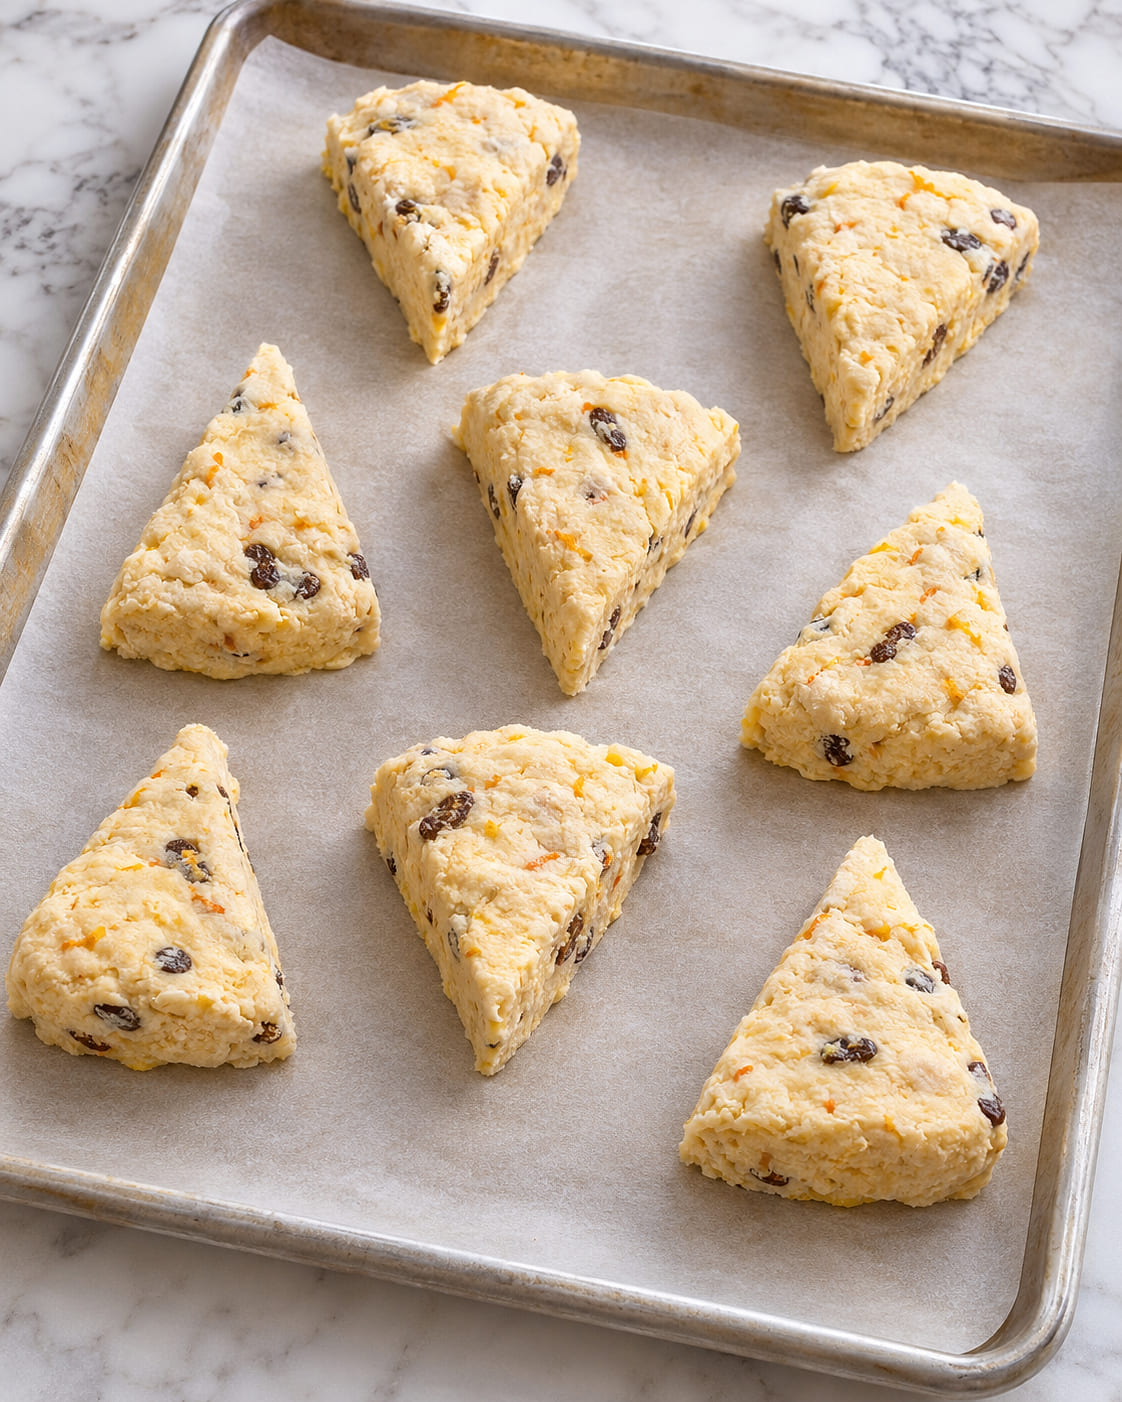
Before baking: Check that all eight wedges are distinct, their cut sides are exposed, and raisins sitting on the upper surfaces have been tucked beneath the dough to reduce scorching.
Also check the egg wash placement. It belongs on the tops, not the cut sides, because coating those exposed edges may interfere with expansion during baking.
How to Tell When Orange Raisin Scones Are Done
The approved conventional-oven baking window is approximately 18–20 minutes at 400°F (204°C), with a pan rotation after 12 minutes. Time is a guide, but the finished appearance and physical checks are more important than the timer alone.
- Top: The upper surface and corners are deep golden-brown, with a visible sparkling sugar crust.
- Sides: The sidewalls remain pale-creamy with distinct expansion fissures. They feel firm and set rather than soft or doughy.
- Base: The underside is uniformly golden-brown, dry, and firm, without wet or translucent butter patches.
- Center: A wooden toothpick or slender skewer inserted into the thickest wedge comes out dry and clean, without raw batter.
If the tops are golden but the centers are uncertain, rely on the side, base, and toothpick checks together. Color alone does not establish that the thickest portion is fully baked.
Common Problems and What to Check
The Butter Is Clumping or Smearing
The intended mixture has visible, separate, flour-coated ribbons. Greasy patches or smearing indicate that the butter is no longer maintaining the desired condition. For the next batch, confirm that it was frozen solid for the required advance period and avoid prolonged handling.
The Dough Looks Rough and Uneven
This can be exactly right. The approved dough is shaggy rather than smooth. Look for mostly moistened flour and distributed raisins instead of judging readiness by a polished or elastic appearance.
The Wedges Are Difficult to Separate
Dragging a blade through the dough can disturb the cut edges. A straight-edged bench scraper or long chef’s knife is appropriate, and clean downward cuts are the intended result. Avoid compressing the wedges back together after cutting.
Raisins Are Darkening on the Surface
Exposed raisins are more vulnerable to scorching. For the next batch, check the shaped dough carefully and tuck surface raisins beneath the dough rather than leaving them directly exposed.
The Tops Are Golden but the Centers Are Uncertain
Check for firm, fissured sides, a dry golden base, and a clean toothpick from the thickest wedge. These signs together provide a more complete doneness assessment than top color alone.
The Glaze Has Not Formed a Set Surface
The approved finish allows approximately 10 minutes at room temperature after glazing. Actual setting may vary with room conditions. Leave the scones undisturbed until the glaze has a visibly set surface.
Approved Ingredient and Serving Options
The following alternatives adjust the fruit, dairy, or finish while preserving the main recipe. The standard glazed buttermilk recipe remains the reference version.
Golden Raisins or Sultanas
Golden raisins or sultanas may replace dark seedless raisins using the same 1/2-cup volume. The approved variation keeps the other dough ingredients and standard baking method unchanged.
Dried Zante Currants
Dried Zante currants may replace raisins using the same 1/2-cup volume. These smaller dried fruits provide a different distribution and flavor. Measure by volume rather than assuming their weight matches that of raisins.
Acidified Whole Milk Instead of Cultured Buttermilk
When cultured buttermilk is unavailable, the approved alternative uses 1 1/2 teaspoons (7.5 mL) fresh lemon juice or strained orange juice, with whole milk added to reach a total of 1/2 cup (120 mL). The mixture stands for 5 minutes and must be chilled before use.
Its thickness, flavor, and dough behavior may differ from cultured buttermilk. Its preparation and chilling require advance time outside the standard recipe timeline.
Unglazed Afternoon-Tea Scones
For the approved afternoon-tea variation, omit the post-bake orange glaze while keeping the dough, pre-bake sugar finish, and baking instructions unchanged. Serve warm or at room temperature with clotted cream, orange marmalade, and hot black tea.
For a separate traditional approach using Amasi and no eggs, see our egg-free traditional Amasi scones. That is a different recipe, not a direct ingredient substitution for this orange raisin dough.
Serving and Cooling Notes
Each finished scone is one generous triangular serving. The glazed version is intended to reach room temperature before the orange glaze is applied, allowing the two finishes to remain distinct.
The nominal post-bake schedule consists of a 5-minute pan rest, 20 minutes on a cooling rack, and a subsequent 10-minute glaze-setting period. If the scones remain warm after the scheduled cooling, allow additional time before glazing.
The unglazed afternoon-tea variation offers a different serving presentation, while the fully glazed version retains the sweet citrus finish described in the Recipe Card.
Frequently Asked Questions
Can I use golden raisins instead of dark raisins?
Yes. Replace 1/2 cup (80 g) dark seedless raisins with 1/2 cup golden raisins or sultanas. The fruit will have a lighter color and somewhat different flavor. Keep the dough liquid measurements and standard baking window unchanged.
What can I use if I do not have cultured buttermilk?
Add 1 1/2 teaspoons (7.5 mL) fresh lemon juice or strained fresh orange juice to a liquid measuring cup. Add whole milk until the total reaches 1/2 cup (120 mL). Stir, leave at room temperature for 5 minutes until lightly thickened or curdled, and chill before using. Its thickness, flavor, and dough behavior may differ from cultured buttermilk. The additional preparation and chilling are excluded from the standard 69-minute timeline.
Can I serve these orange raisin scones without the glaze?
Yes. For the approved afternoon-tea serving variation, omit the post-bake orange glaze and serve the baked scones warm or at room temperature with clotted cream and orange marmalade alongside hot black tea. Keep the dough, egg wash, sugar crust, baking temperature, and baking duration unchanged. The scones will not have the additional sweet citrus glaze.
Explore More Biscuit and Bread Baking
These orange raisin scones belong to the wider family of home-baked biscuits and breads, although their egg-enriched citrus dough and triangular shape make them a distinct recipe.
For more baking options and guidance across the category, visit our homemade biscuits and breads guide. It provides a broader starting point when you’re deciding what to bake next.
Save This Recipe
Enter your email below and we'll send the link straight to your inbox. You'll also get fresh baking recipes each week.
More From Biscuits & Breads

You Might Also Like




Thank you for the recipe,I wouldn’t like to receive them in my email
Thank you for the recipe,I would like to receive them in my email.
Correcting what I sent earlier,typing error
Thank you so much! No worries at all about the typing error. We’re so happy you enjoyed the recipe! You can subscribe to our email list on the website to receive more delicious recipes straight to your inbox.
I love this recipe I will like to get more of it in my email
Thank you for your interest in our recipe, Mary! You can subscribe to our newsletter to receive more recipes like this one directly in your email inbox. Just click on the ‘Subscribe’ button at the top of our website.