I have been baking biscuits and breads in my home kitchen for over 14 years. In that time I have made every mistake there is to make — flat biscuits, gummy loaves, dense rolls that could double as paperweights. I have tested, failed, retested, and figured out exactly what works in a real home kitchen with real pantry ingredients and no professional equipment.

This guide exists because of those failures. Everything I learned across hundreds of test rounds is in here — the techniques, the troubleshooting, the honest explanations of why things go wrong and exactly how to fix them.
Whether you are making your very first loaf of bread or you have been baking for years and want to sharpen your technique, this is the guide I wish I had when I started. These recipes were developed and tested multiple times in my home kitchen before I published a single one. I will walk you through every step.
What This Guide Covers
Biscuits and breads are the foundation of home baking. They are also where most beginner bakers struggle — because unlike cakes and cookies, bread dough is alive. It responds to temperature, humidity, and handling in ways that feel unpredictable until you understand what is actually happening.
This guide covers everything:
- Buttermilk biscuits — the most requested recipe on this site, and the one I have tested more than any other
- Cinnamon rolls — enriched dough that looks impressive but is completely manageable for home bakers
- Milk bread and Japanese milk bread — the softest, most pillowy breads you will ever pull from your oven
- Croissants and pastry doughs — the advanced tier, with full technique guidance
- Quick breads, skillet breads, no-yeast breads, and everything in between
By the end of this guide you will understand not just how to follow a recipe but why each step matters — and what to do when something goes wrong.
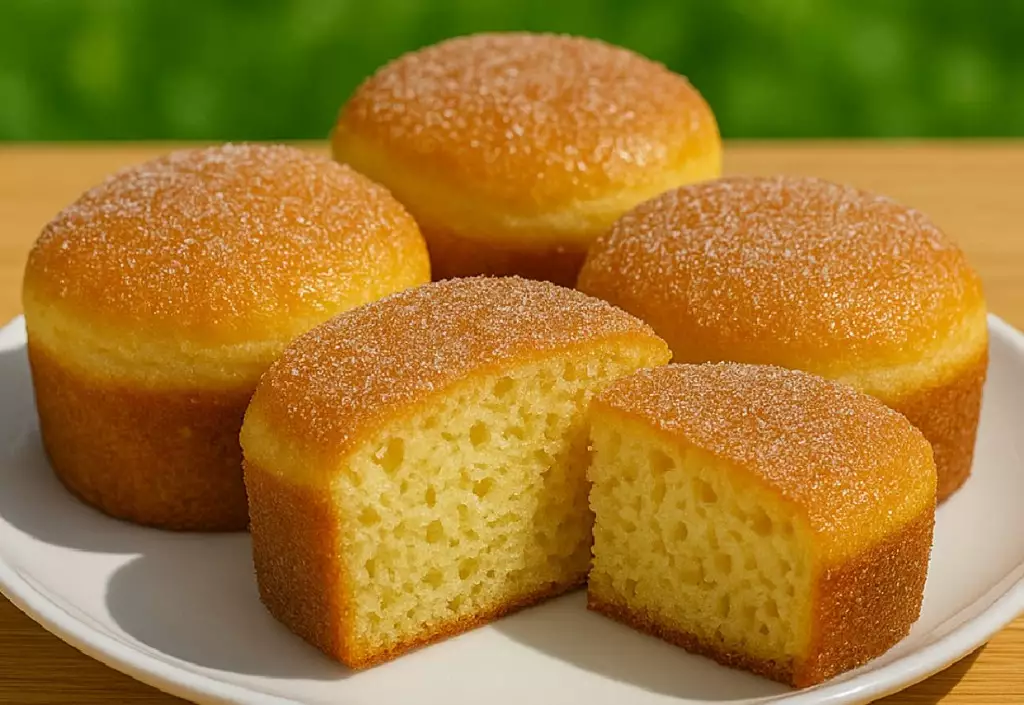
Buttermilk Biscuits: The Foundation of Everything

I have tested our melt-in-your-mouth buttermilk biscuit recipe more than 40 times. Out of every recipe on this site it is the one I have put through the most rounds — flat biscuits, layered biscuits, overbaked biscuits, underbaked biscuits — until I understood exactly what separates a biscuit that shatters into flaky layers from one that bakes into a dense puck. It comes down to three things: cold butter, minimal handling, and the right flour.
Why Buttermilk Makes Better Biscuits
Buttermilk does two things that regular milk cannot. First, its acidity reacts with baking soda to create carbon dioxide bubbles — those bubbles are what push your biscuit layers apart as they bake. Second, the slight tang of buttermilk adds a depth of flavor that makes the difference between a good biscuit and an unforgettable one.
If you do not have buttermilk, add one tablespoon of white vinegar or lemon juice to one cup of regular milk, stir, and let it sit for five minutes. This is not identical to real buttermilk but it works reliably in every test I have run.
The Cold Butter Rule
This is the part most recipes mention but do not fully explain. Your butter must be genuinely cold — not cool, not slightly softened, but straight from the refrigerator cold. Here is what actually happens when you work cold butter into flour: the butter stays in small solid pieces, coated in flour. When those pieces hit the heat of the oven, the water inside the butter turns to steam. That steam pushes the layers apart. If your butter is warm it melts into the flour before baking and you lose every single layer.
My method: grate frozen butter directly into the flour using a box grater. It takes 30 seconds and distributes the butter perfectly without warming it from the heat of your hands.
Recipes In This Group
- Lemon vanilla glazed blueberry biscuits — a sweet variation that works for breakfast or dessert
- Soft condensed milk biscuits — richer and slightly sweeter, perfect for afternoon tea
- Homemade honey buttermilk bread — the natural next step once you have mastered biscuits
- Orange raisin scones — scones use the same cold butter technique as biscuits
- Egg-free traditional amasi scones — a reliable dairy-forward variation
- Keto blueberry donuts — for readers who need low-carb alternatives
- Navajo cornbread with cheddar and jalapeños — a bold savory biscuit-adjacent bake
- Crispy buttermilk fried cornbread — skillet cornbread using the same buttermilk base
Cinnamon Rolls and Enriched Doughs

Homemade cinnamon rolls intimidate more home bakers than almost any other recipe. I understand why. The dough needs to rise. There is yeast involved. The timing feels uncertain. But here is what I have learned after testing enriched doughs more times than I can count: the process is forgiving once you understand what you are looking for.
What Is an Enriched Dough?
An enriched dough is any bread dough that contains fat — usually butter, eggs, milk, or sugar — in addition to flour, water, and yeast. The enrichment makes the dough softer, richer, and more tender than a lean dough like a baguette or a pizza base. Cinnamon rolls, brioche, donuts, and milk buns all use enriched doughs.
The trade-off is time. Enriched doughs rise more slowly because the fat coats the yeast and slows fermentation. This is actually a good thing — a slow rise develops more flavor. Trust the process here.
Yeast: The Most Misunderstood Ingredient
Most failed cinnamon rolls fail at the yeast stage. Here is what actually happens in each failure scenario:
Water too hot (above 43°C / 110°F): You kill the yeast. The dough will not rise at all. It will look and feel fine but will produce a dense, gummy roll that no amount of extra baking time will fix.
Water too cold (below 35°C / 95°F): The yeast activates too slowly. Your dough will eventually rise but it will take twice as long and the result will be less predictable.
Sweet spot: 38–40°C / 100–105°F. Warm to the touch, like comfortable bathwater. If you do not have a thermometer, hold your wrist under the water — it should feel warm but not hot.
Recipes In This Group
- Fluffy homemade doughnuts — same enriched dough base as cinnamon rolls, fried instead of baked
- Easy homemade Nutella doughnuts — filled variation that disappears in minutes
- Fluffy fried doughnuts no yeast — for when you want the result without the wait
- Homemade churros — choux-based, deeply satisfying, faster than you expect
- Bomboloni Italian cream filled donuts — a showstopper that is easier than it looks
- Homemade fluffy bomboloni — a slightly different take on the Italian classic
- Soft cinnamon donut bread — the best of both worlds
- Fluffy homemade crescent donuts — a lighter, flakier variation
- Vanilla French beignets — New Orleans style, pillowy and golden
- Fluffy baked paczki with jam filling — a Polish classic baked not fried
- Homemade Simpsons donuts — fun, pink-glazed, and always a hit with kids
- Mini sugar doughnuts — small batch, quick, and completely addictive
- Quick and simple homemade donuts — when you want results in under an hour
- Fried cocoa swivels — a unique cocoa-twisted variation worth trying
Milk Bread and Soft Loaves

Japanese milk bread is the softest bread I have ever made in my home kitchen. The secret is a technique called tangzhong — a small portion of the flour and milk cooked together into a paste before being added to the dough. This pre-cooked paste holds moisture inside the bread for days, keeping it soft long after most loaves have gone stale.
I know tangzhong sounds complicated. It is not. It takes five minutes on the stovetop and it is the single biggest technique upgrade you can make to your bread baking. Once you understand it you will use it everywhere.
The Tangzhong Method Explained
Take 5% of your total flour and 5 times its weight in milk. Cook them together in a small saucepan over medium heat, stirring constantly, until the mixture thickens into a smooth paste — about 3 minutes. Remove from heat, let it cool to room temperature, then add it to your dough with the other ingredients.
What this does: the starch in the flour gelatinizes as it cooks, trapping water molecules in a structure that does not release during baking. The result is a crumb that stays moist and pillowy for two to three days longer than a standard loaf.
Recipes In This Group
- Soft and fluffy homemade milk bread — the master recipe, start here
- Cloud soft condensed milk bread — sweeter, richer, and even more tender
- Soft fluffy sweetened condensed milk bread — a slightly different ratio that produces a tighter crumb
- Soft vanilla milk bread — lightly sweetened with a beautiful golden crust
- Soft and fluffy milk brioche — the enriched cousin of milk bread, butter-rich and extraordinary
- Soft and fluffy milk buns — individual rolls using the same milk bread dough
- Cheddar cheese quick bread — no yeast, no rising, ready in one hour
- Amish white bread — a classic American sandwich loaf with a slightly sweet crumb
Croissants, Pastry, and Advanced Techniques

Homemade croissants are the most technically demanding recipe in this category. I will not pretend otherwise. They require laminated dough — a process where butter is folded into the dough repeatedly to create hundreds of distinct layers. It takes time and patience.
But here is what I want you to know: croissants are not impossible in a home kitchen. They require precision, not skill you are born with. If you follow the steps exactly, rest the dough when I say to rest it, and use good quality butter, you will pull croissants from your oven that are genuinely flaky, genuinely buttery, and genuinely yours.
The Lamination Process Simply Explained
Lamination means alternating layers of dough and butter. Each fold doubles the layers. After three folds you have 27 layers of butter running through your dough. When those layers hit the heat of the oven, the water in the butter turns to steam and forces every single layer apart. That is where the flakiness comes from.
The most common mistake in lamination is letting the butter get too warm. If the butter softens and starts to absorb into the dough instead of staying in distinct layers, your croissants will be bready and heavy instead of flaky and light. Work quickly, chill the dough between folds, and you will get there.
Recipes In This Group
- Lemon cream eclairs with choux pastry — choux is a completely different technique but equally rewarding
- Apricot cream puffs — same choux base as eclairs, different shape and filling
- Easy nun’s puffs — a lesser-known choux classic that deserves more attention
- Classic custard slice with puff pastry — uses store-bought or homemade puff pastry
- Puff pastry cream horns — elegant, impressive, and surprisingly simple
- Minced meat cheese puff swirls — savory pastry application
- Cornish beef pasties — traditional British shortcrust pastry technique
- Curried beef hand pies — same shortcrust technique with a bold filling
Quick Breads, No-Yeast Breads, and Everyday Loaves

Not every bread needs yeast. Not every loaf needs an hour of rising time. This section is for the days when you want fresh homemade bread on the table without the wait.
Quick breads use baking powder or baking soda instead of yeast for their rise. The chemical reaction happens instantly when liquid hits the leavening agent, which means you mix, pour, and bake — no rising time needed.
The Quick Bread Formula
Every successful quick bread follows the same basic ratio: roughly 2 cups flour to 1 cup liquid to 1 teaspoon baking powder. Everything else — the fruit, the spices, the mix-ins — is variation on this foundation. Once you understand the formula you can build your own quick bread from what is in your pantry.
Recipes In This Group
- Fluffy homemade bread loaf — the everyday sandwich loaf every home kitchen needs
- Homemade fluffy bread rolls — dinner rolls that work for any occasion
- Easy 4-ingredient bread rolls — the simplest bread you can make
- Soft and buttery dinner rolls — classic American-style rolls with a feather-soft crumb
- Soft Amish dinner rolls — slightly sweet, incredibly tender
- The softest cloverleaf dinner rolls — a beautiful pull-apart presentation
- Texas Roadhouse rolls — the copycat recipe that actually works
- Authentic homemade focaccia — olive oil-rich, dimpled, and deeply satisfying
- Easy homemade naan bread — skillet-cooked flatbread in under 30 minutes
- Turkish bread with yogurt — the yogurt adds tenderness and a subtle tang
- Homemade golden crust baguette — a lean dough that teaches you everything about crust development
- Homemade pizza dough — versatile, reliable, and ready to use in two hours
- No-knead donuts baked not fried — minimal effort, maximum result
- Soft homemade bread dough — a master dough recipe that works for rolls, loaves, and more
- 20-minute bread recipe — for when you need bread right now
- Easy 10-minute skillet bread — no oven needed, stovetop only
- Cheese potato bread in a frying pan — a hearty stovetop loaf with real character
- No-knead cheesy bread no yeast — mix, rest, bake — nothing more required
- Best zucchini bread — moist, warmly spiced, and a reliable crowd pleaser
- Homemade chocolate chip zucchini bread — the dessert version of a classic
- Soft and moist banana bread without a mixer — one bowl, no equipment needed
- Moist applesauce bread with fall spices — naturally sweetened and warmly spiced
- Moist hummingbird bread — banana, pineapple, and pecans in one extraordinary loaf
- Homemade pineapple quick bread — tropical, bright, and effortlessly moist
- Soft homemade sesame breadsticks — snackable, shareable, and gone in minutes
- Mozzarella stuffed soft pretzels — a weekend baking project that always impresses
- 10-minute chicken stuffed flaky rolls — quick savory rolls using pastry technique
- Cheesy potato snack bites — small-format bakes with big flavor
Flourless and Alternative Breads

This section is for readers who need to bake without traditional wheat flour — whether for dietary reasons or simply out of curiosity. I have tested every one of these recipes multiple times because flourless baking requires more precision than standard bread. The results surprised me.
Recipes In This Group
- Quick healthy bread without white flour or yeast — the entry point for flourless baking
- Flourless oat and chia bread — naturally gluten-free and genuinely satisfying
- Flourless one-minute microwave bread in a jar — when you need bread in the next 60 seconds
- Best gluten-free lentil cheese bread — protein-rich and completely grain-free
- Blueberry fluffy cottage cheese cloud bread — light, airy, and genuinely delicious
- Fluffy cloud bread rolls — the roll version of the cloud bread technique
- Fluffy cottage cheese cloud bread — the master cloud bread recipe to start with
Pro Tips From My Kitchen
These are the lessons that took me years to learn. I am giving them to you now so you do not have to repeat my mistakes.
1. Weigh your flour. One cup (120–150g) of flour can vary by up to 30% depending on how you scoop it. Too much flour is the single most common cause of dense bread and dry biscuits. A kitchen scale costs less than a bag of flour and will change your baking permanently.
2. Your oven runs hotter or cooler than it says. Almost every home oven is calibrated incorrectly. An oven thermometer costs very little and tells you the truth. If your breads consistently over-brown on the outside before cooking through, your oven runs hot. If they take longer than the recipe says, it runs cool. Adjust accordingly.
3. The windowpane test tells you when bread dough is ready. Take a small piece of dough and stretch it gently between your fingers. If it stretches thin enough to see light through without tearing, the gluten is fully developed and the dough is ready to rise. If it tears immediately, keep kneading for two more minutes and test again.
4. Steam is your friend for crusty bread. Professional bakeries inject steam into their ovens for the first 10 minutes of baking. At home, place a small oven-safe dish of boiling water on the bottom rack when you put your bread in. The steam keeps the crust soft enough to expand fully before it sets, giving you better oven spring and a crunchier final crust.
5. Let bread cool completely before cutting. I know this is the hardest rule to follow. But the inside of a freshly baked loaf is still cooking as it cools — the residual heat is finishing the crumb structure. Cut too early and you get a gummy, compressed interior. Give it at least 30 minutes. Your patience will be rewarded.
Troubleshooting — What Went Wrong and How to Fix It
These are the most common problems readers write to me about. Every one of them happened to me first.
My biscuits came out flat and dense. The most likely cause is warm butter. Cold butter is not optional — it is the entire mechanism of biscuit layers. Also check that your baking powder is fresh. Drop a teaspoon into hot water. If it does not bubble vigorously, it is dead and needs replacing.
My bread dough is not rising. Your yeast is either dead or your water was too hot. Test your yeast before you use it — dissolve it in warm water with a pinch of sugar and wait 10 minutes. It should foam and smell yeasty. If nothing happens, your yeast is bad and no amount of waiting will fix your dough.
My loaf is dense and gummy inside. Either underbaked or underproofed — or both. Use an instant-read thermometer. Bread is done when the internal temperature reaches 88–93°C (190–200°F). Do not rely on time alone. Every oven is different.
My cinnamon rolls are tough and chewy. You over-kneaded the dough or used too much flour. Enriched doughs need less kneading than lean doughs because the fat tenderizes the gluten naturally. Also check your flour measurement — too much flour is almost always the problem.
My bread collapsed after rising. It over-proofed. The yeast ran out of food, produced too much gas, and the gluten structure weakened and collapsed. Next time, shape your dough when it has doubled in size — not when it has tripled. When in doubt, a slightly under-proofed dough recovers in the oven. An over-proofed dough does not.
My biscuits spread sideways instead of rising up. Your baking dish was too large, your butter was too warm, or you twisted the cutter as you pressed it into the dough. Always press straight down and lift straight up — twisting seals the edges and prevents the layers from separating and rising.
Yes — every recipe on this site was developed and tested by hand. A stand mixer speeds up kneading but it is never required. Use your hands, pay attention to the dough's texture, and use the windowpane test to know when you are done. Baking soda is pure sodium bicarbonate — it needs an acid in the recipe (buttermilk, yogurt, lemon juice) to activate. Baking powder contains both sodium bicarbonate and a dry acid, so it activates with moisture alone. Using the wrong one or confusing the two is a common reason quick breads fail to rise properly. Yes — and I do it regularly. Let the bread cool completely, wrap it tightly in plastic wrap, then place it in a freezer bag. It keeps for up to three months. Thaw at room temperature overnight or slice from frozen and toast directly. Tap the bottom of the loaf — a fully baked bread sounds hollow. The crust should be deep golden and firm. That said, a thermometer is the only way to be certain. For a piece of equipment that costs very little it is one of the best investments you can make in your baking. Commercial bread contains preservatives and emulsifiers that extend shelf life. Homemade bread has neither. Store it in a bread box or wrapped in a clean cloth at room temperature — not in the refrigerator, which accelerates staling. For longer storage, freeze it.Frequently Asked Questions
Can I make bread without a stand mixer?
What is the difference between baking powder and baking soda in bread?
Can I freeze homemade bread?
How do I know when my bread is done without a thermometer?
Why does my homemade bread go stale so fast?
Your Next Steps
You now have everything you need to bake biscuits and breads that work — every time, in your real home kitchen, with ingredients you already have.
Start with what feels achievable. If you are a beginner, our easy 4-ingredient bread rolls or 10-minute skillet bread will give you a win on your first attempt. If you are ready for a challenge, the buttermilk biscuit recipe is the most rewarding place to build your technique.
And when something goes wrong — because occasionally it will — come back to the troubleshooting section. Every problem listed there happened in my kitchen first. You are not doing it wrong. You are learning.
This guide was developed and tested across multiple recipe rounds in my home kitchen. Every recipe linked here has been tested before publication — because that is the only standard I hold myself to.
Aveline Sinclair, Founder of RecipesCrock
Save This Recipe
Enter your email below and we'll send the link straight to your inbox. You'll also get fresh baking recipes each week.
More From Biscuits & Breads

You Might Also Like