
These egg free amasi scones have a tender center, gently golden tops, and the familiar tang of cultured milk. They are lovely served warm with butter or jam, and you don’t need eggs to make the dough rise.

The important part is how you handle the dough. Keep the butter and amasi cold, stop mixing while the dough still looks slightly rough, and cut the rounds without twisting. This recipe makes eight scones, with 10 minutes of preparation, 15 minutes of baking, and 10 minutes of cooling before serving.
Why amasi makes these scones tender
Amasi, also called maas, is a cultured milk commonly used in South African home baking. It brings moisture and a gentle tang to the dough. Its acidity also reacts with the measured baking soda, helping the scones rise without eggs.
Baking powder supplies additional lift. Meanwhile, small pieces of cold butter remain scattered through the flour mixture. As the scones bake, those butter pockets help create a tender crumb with light layers. The combination matters more than mixing the dough until it looks perfectly smooth.
These scones are different from American biscuits. Their measured sugar gives them a softly sweet tea time character, while the cultured dairy keeps the flavor pleasantly tangy. For a closer look at the related technique, our buttermilk biscuit recipe shows another way cold fat and cultured dairy contribute to texture.
Egg Free Amasi Scones
Tender South African style egg free amasi scones made with cold cultured milk and butter, gently folded and baked until lightly golden.
Ingredients
- 2 cups all purpose flour 250 g. Room temperature. Spooned into measuring cups and leveled
- 1 tablespoon additional all purpose flour. 8 g
- 1/3 cup granulated white sugar 65 g. Room temperature
- 2 teaspoons baking powder 8 g. Fresh, aluminum free, double acting
- 1/4 teaspoon baking soda 1.5 g. Also called bicarbonate of soda
- 1/2 teaspoon fine table salt 3 g
- 4 tablespoons unsalted butter 60 g. 1/2 US stick. Refrigerator cold at About 38–40°F (3–4°C), cut into 1/4-inch (6 mm) cubes
- 3/4 cup amasi (maas), South African cultured milk. 180 ml. Refrigerator cold
- 1 to 2 teaspoons additional cold amasi. 5–10 ml (optional)
- 1 tablespoon whole milk or amasi 15 ml. Refrigerator cold. Reserved for brushing the flat tops before baking
Instructions
- Position an oven rack in the center and set the oven to 400°F (200°C) using conventional bake mode with the convection fan off. Allow the oven to preheat fully for at least 15 minutes before baking. Line one large rimmed baking sheet with parchment paper or a clean silicone baking mat. Keep the butter and amasi refrigerated until needed.
- In a large mixing bowl, whisk together the 2 cups (250 g) all purpose flour, 1/3 cup (65 g) granulated sugar, 2 teaspoons (8 g) baking powder, 1/4 teaspoon (1.5 g) baking soda, and 1/2 teaspoon (3 g) fine table salt until evenly distributed. Keep the additional tablespoon of flour separate for shaping.
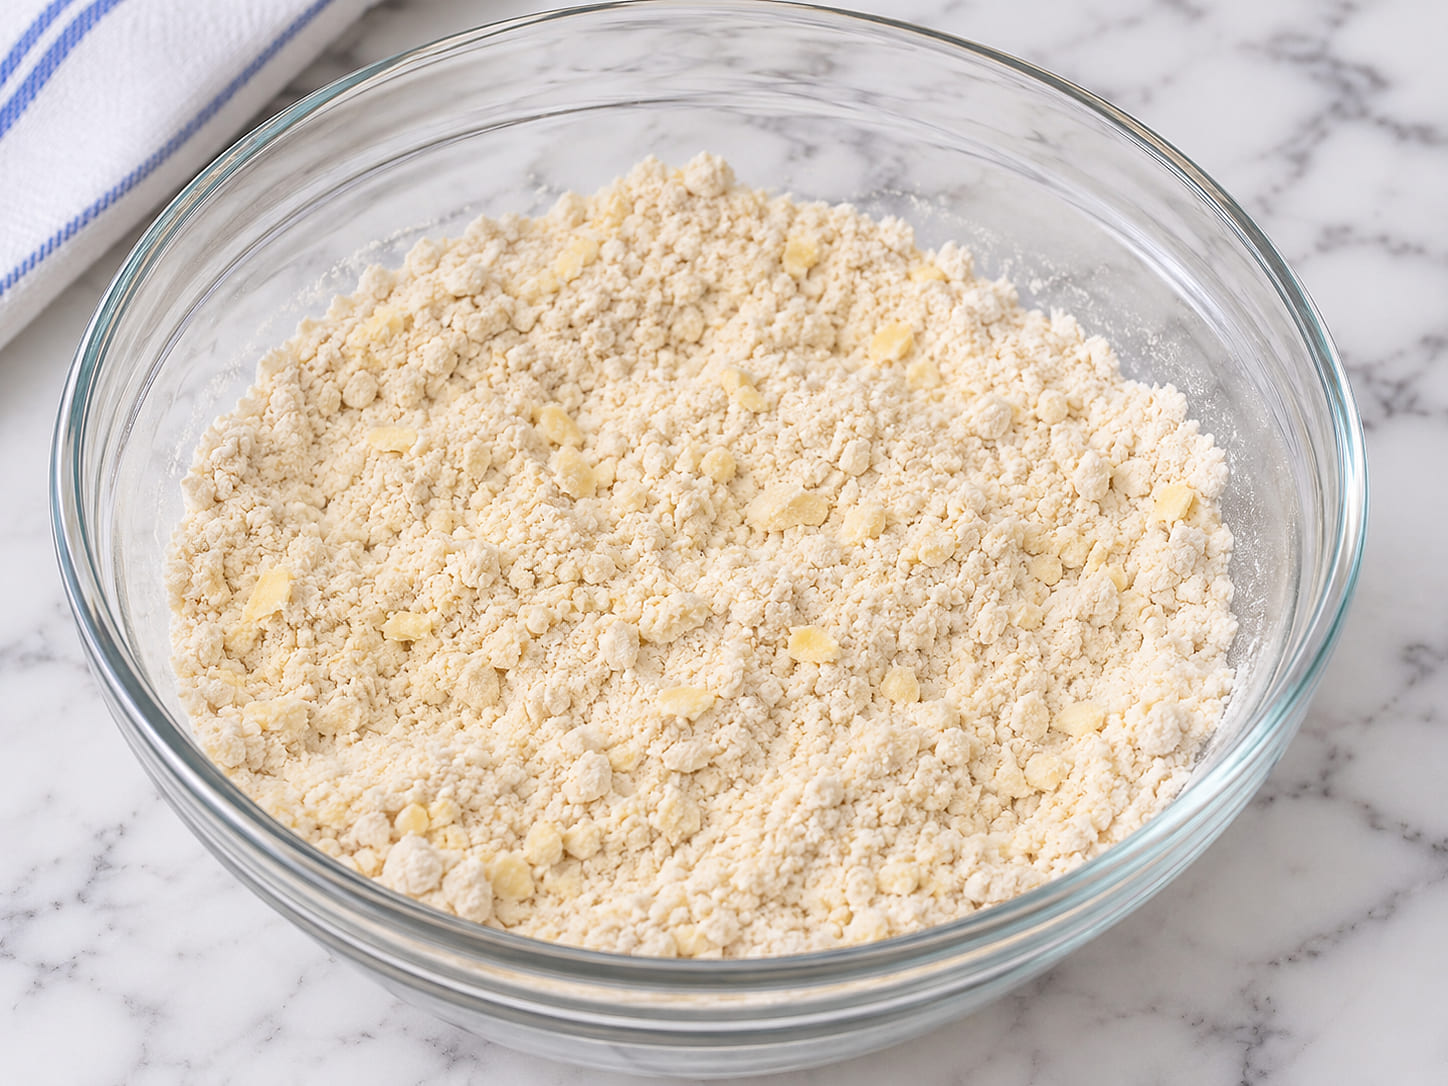
- Scatter the 4 tablespoons (60 g) of cold, cubed butter over the dry mixture. Using a pastry blender or clean, dry fingertips, work the butter into the flour until it resembles coarse breadcrumbs with visible pea sized, flattened butter flakes. Work briskly and stop before the mixture becomes a smooth paste.
- Gently stir the cold amasi before measuring, then pour 3/4 cup (180 ml) into the flour butter mixture. Fold gently with a wooden spoon or firm silicone spatula until the dough forms a shaggy, soft, slightly sticky mass with no dry powdery streaks at the bottom. If stubborn dry flour remains, add 1 to 2 teaspoons of additional cold amasi, only as needed. Do not knead the dough in the bowl or mix until smooth.
- Lightly dust the work surface with part of the reserved tablespoon of flour. Turn out the shaggy dough and use lightly floured hands to pat and fold it over itself 2 to 3 times, stopping as soon as it holds together. Gently pat it into an even round slab 1 inch (2.5 cm) thick. Do not use bread style kneading or press the dough aggressively.
- Dip the edge of a 2 1/2-inch (6.5 cm) round cutter into the remaining reserved flour. Press straight down through the dough and lift the cutter vertically without twisting. Repeat, flouring the cutter as needed. Gently gather the scraps once, pat them back to 1 inch (2.5 cm) thick, and cut the remaining rounds to make 8 scones.
- Transfer all 8 scones to the prepared baking sheet, leaving 1 inch (2.5 cm) of open space between them. Lightly brush only their flat tops with the 1 tablespoon (15 ml) of cold whole milk or amasi. Prevent the liquid from dripping down the cut sides, which could restrict their rise.
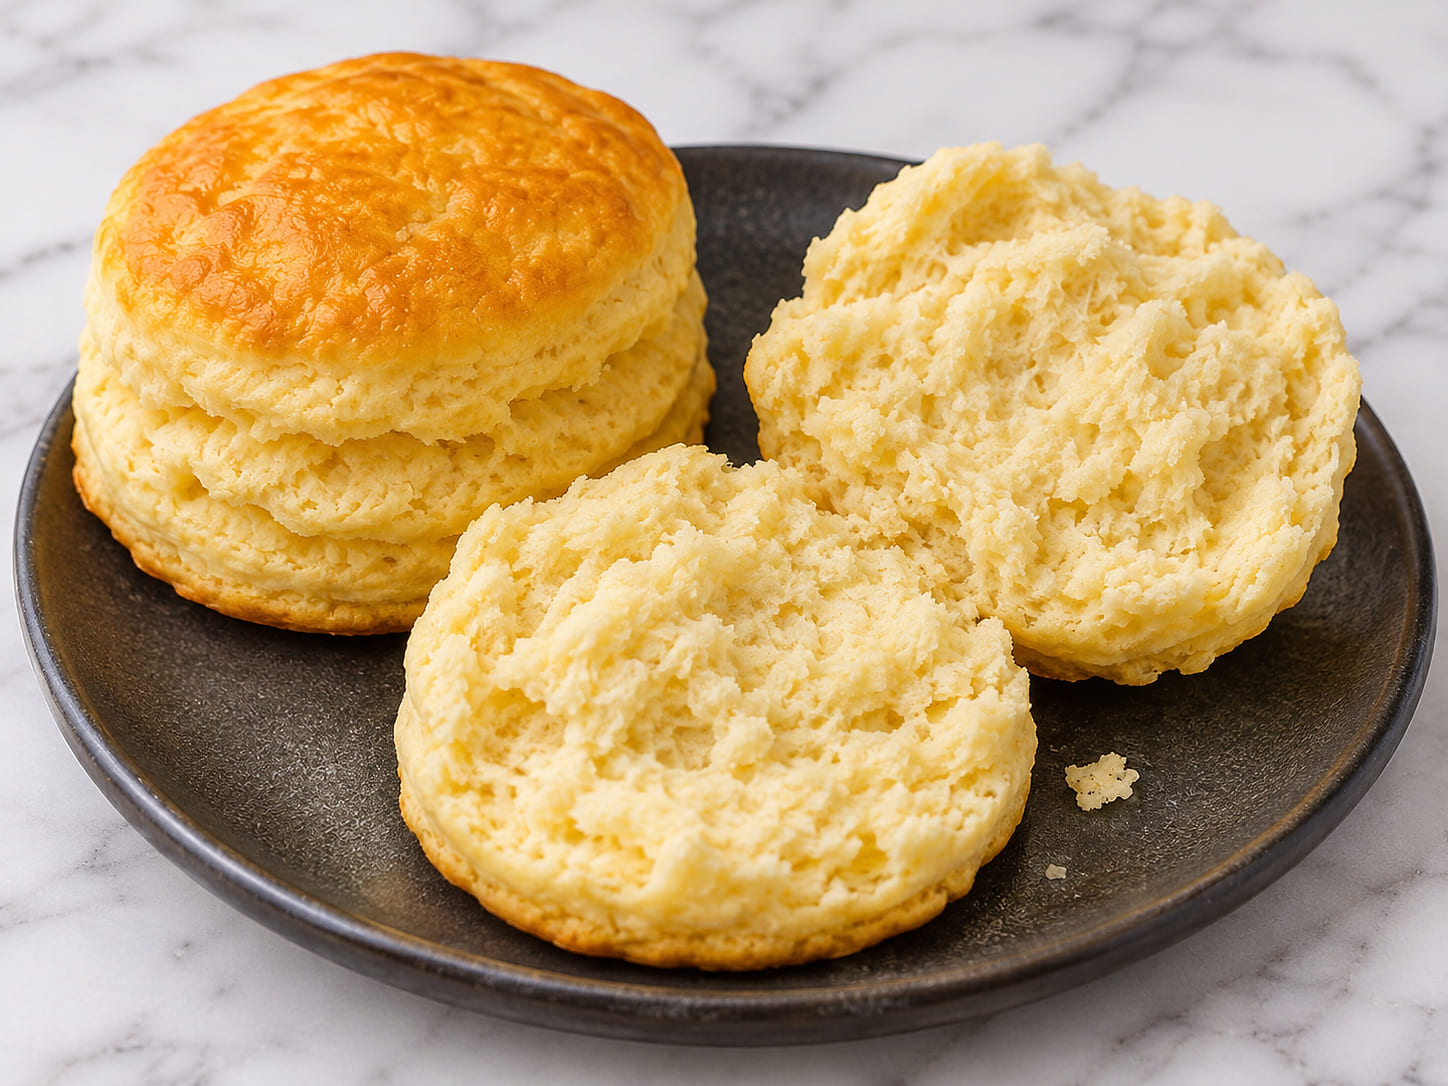
- Bake immediately on the center rack of the fully preheated conventional oven at 400°F (200°C) for 15 minutes. Begin checking at 13 minutes. The scones should rise noticeably upward with tall, mostly straight sides and lightly golden, matte to satin tops. Check that the undersides are set and pale to medium golden, the centers spring back lightly when pressed, and a toothpick inserted into the thickest scone comes out without wet or gummy batter. Do not wait for a dark, glossy crust.
- Remove the baking sheet from the oven and immediately transfer the baked scones to a wire cooling rack. Allow them to cool for 10 minutes before splitting and serving warm. Moving them off the hot sheet prevents trapped steam from softening their undersides.
Notes
- Yield: 8 scones cut from a 1-inch thick dough slab with a 2½-inch round cutter.
- Timing: 10 minutes preparation, 0 minutes resting, 15 minutes baking, and 10 minutes cooling, for 35 minutes total.
- The dough should remain shaggy, soft, and slightly sticky. Do not knead it until smooth.
- Use cold ingredients and bake immediately after shaping.
- For a softer pull apart finish, arrange the rounds with their edges barely touching instead of spacing them 1 inch apart.
- Amasi substitution: Use 3/4 cup (180 ml) cold cultured buttermilk. Begin with approximately 2/3 cup and add the remaining liquid gradually until the correct dough consistency is reached.
- Another amasi substitution is 3/4 cup of a thick but pourable mixture of whole milk Greek yogurt and cold milk. The finished scones may be tangier and denser.
- Butter substitution: Use 4 tablespoons (60 g) firm chilled block baking margarine instead of butter. Do not use soft tub spread.
- South African flour substitution: Use 2 cups (250 g) unsalted South African self raising flour instead of the all purpose flour and baking powder. Keep the baking soda and salt.
- American flour substitution: Use 2 cups (250 g) pre salted American self rising flour instead of the all purpose flour, baking powder, and added salt. Keep the baking soda.
- Optional vanilla finish: Add 1 teaspoon vanilla extract to the cold amasi and sprinkle 1 tablespoon coarse or demerara sugar over the brushed tops.
- Optional sweet additions: Add up to 1/3 cup chocolate chips or dried cranberries, with 1 teaspoon orange zest if desired, to the flour and butter mixture before adding amasi.
- Optional savory version: Reduce the sugar to 1 tablespoon (12 g) and add 1/2 cup (55 g) finely shredded sharp cheddar and 2 tablespoons finely snipped fresh chives before adding amasi.
- Allergens: Wheat and milk.
- Egg free scones may have paler, less glossy tops than egg washed scones. Use the center and underside doneness checks rather than waiting for deep browning.
What matters before you start
Keep the butter and amasi cold
Use refrigerator cold butter cut into small cubes, along with cold amasi that has been gently stirred before measuring. Cold ingredients make the dough easier to handle without losing the visible butter pieces that contribute to its texture.
When rubbing the butter into the flour, aim for coarse crumbs with some flattened pieces about the size of peas. Don’t continue until everything looks like fine sand. The mixture should still show little pockets of butter rather than becoming a smooth paste.
Measure the flour carefully
For the most consistent result, weigh the all purpose flour at 250 grams. If using measuring cups, spoon the flour into the cup and level it rather than packing it down. The recipe also reserves a small measured amount for dusting the work surface.
That distinction is useful when shaping. Adding generous handfuls of extra flour can make a soft dough noticeably firmer. Use the reserved dusting flour lightly, then work with the dough’s natural softness instead of trying to make it completely dry to the touch.
Understand the right amasi consistency
Traditional amasi is a cultured dairy ingredient with a thicker consistency than ordinary milk. The approved amount produces a shaggy, soft, slightly sticky dough. You should see the flour becoming moistened and gathering into irregular clumps.
If a little dry flour remains at the bottom of the bowl, the recipe allows a small additional amount of cold amasi. Add it only when needed. A dough that is slightly sticky is not automatically too wet, and it should not be corrected by kneading in more flour.
The two handling checkpoints that protect the rise
Stop mixing while the dough is still shaggy
After adding the amasi, stir only until the flour is moistened and the dough begins to hold together. It may look uneven, with soft clumps and rough edges. That is the intended checkpoint.
A smooth, elastic dough would indicate more handling than this method needs. Repeated mixing develops the flour’s gluten, the protein network that gives bread its chew. Here, the goal is a tender scone rather than a stretchy bread dough.
Once the mixture is hydrated, turn it onto the lightly dusted surface and bring it together with two or three gentle folds. Press it into an even slab about 1 inch thick. Avoid squeezing it tightly or repeatedly rolling it thinner and folding it again.
Cut clean rounds without sealing the edges
Use a thin edged 2½ inch round cutter. Press straight down through the slab and lift vertically. Do not twist the cutter as you remove it. Twisting can compress the cut sides and interfere with their upward expansion in the oven.
After cutting the first rounds, gather the scraps gently once and press them back to the same thickness. This helps keep the final scones close in size, which makes their baking more consistent.
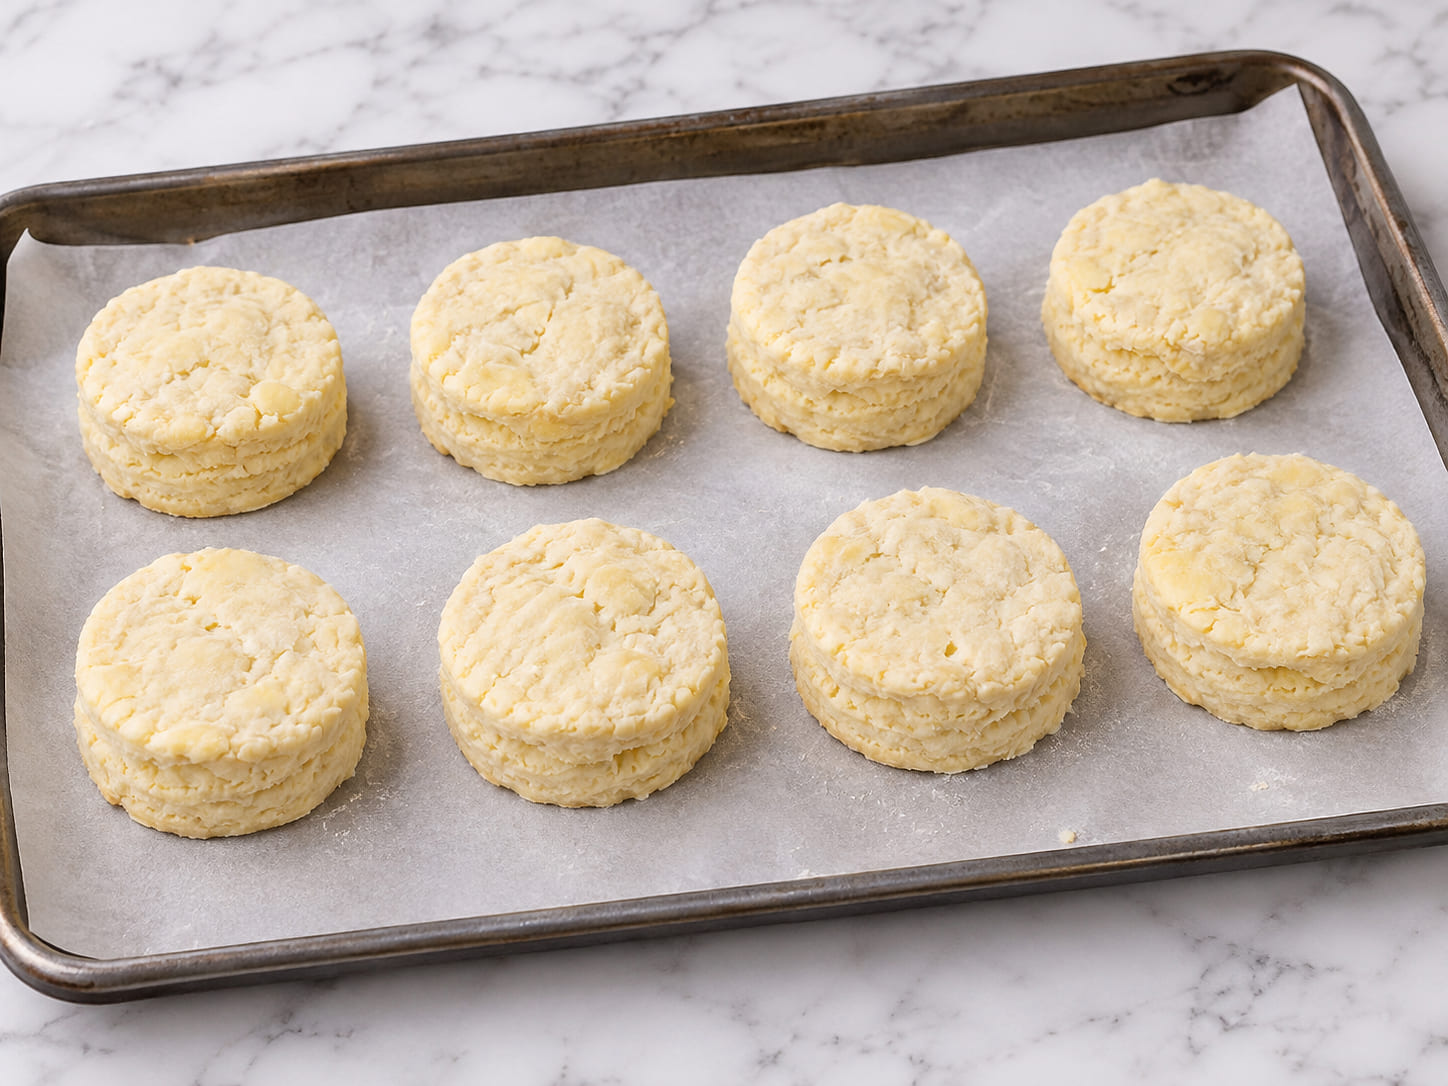
Before baking, check that the rounds are upright, about 1 inch thick before oven rise, and have clean sides. Arrange them about 1 inch apart on the prepared sheet. The approved alternative of barely touching edges produces softer sides, but the main method uses separated rounds.
How to recognize a fully baked egg free scone
The oven should be fully preheated to 400°F (200°C) on conventional bake, with the rack in the center and the fan off. Bake for approximately 15 minutes and begin checking at 13 minutes. The time is a guide, while the appearance and feel tell you whether the centers are ready.
Look for noticeable height and mostly straight sides rather than a flat, spreading shape. The tops should be pale to medium golden with a matte or gentle satin finish. Because the dough and brushing finish contain no eggs, a dark glossy crust is not the target.
Check the underside of a scone for a set, pale to medium golden surface. The top should spring back lightly when touched, without leaving a deep indentation. If you are uncertain about the thickest center, insert a toothpick. It should come out without wet or gummy batter.
These checks work together. A lightly colored top alone does not establish doneness, and waiting for deep browning can leave the scones unnecessarily dry. Once the centers are set, move the scones from the hot baking sheet to a wire rack immediately.
Common problems and how to prevent them
The scones spread instead of rising tall
Butter that becomes too warm during mixing or shaping may contribute to spreading. Another possible cause is a dough that has been made too wet. Keep the ingredients cold, use additional amasi only when dry flour remains, and bake promptly after cutting.
Also inspect the sides of the rounds. A twisted cutter or a finish brushed down the sides may restrict the clean vertical expansion this recipe is designed to encourage.
The crumb is dense or tough
Excessive mixing or kneading may be responsible. Stop when the mixture is shaggy and hydrated, then use only the approved gentle folds to make it cohesive. Don’t work the dough until it resembles smooth bread dough.
Compression during shaping can also work against the desired height. Pat the dough to the specified thickness rather than pressing it into a tightly packed disc. The goal is a slab that holds together without losing its soft structure.
The scones seem dry
First consider the flour measurement. Packed cups can add more flour than intended. Also check whether the dough was mixed until dry and stiff, or whether the scones stayed in the oven while you waited for a darker crust.
Next time, weigh the flour, use the approved hydration checkpoint, and begin checking the oven at 13 minutes. A tender interior and set center matter more than achieving a deep brown surface.
The tops brown unevenly
Check that the oven is using the approved conventional setting rather than a fan setting, which can brown the exterior faster. Use the center rack and make the rounds as even in thickness as possible.
Brush only the flat tops with the measured cold milk or amasi. Avoid allowing the liquid to run down the cut edges. Uneven brushing can produce uneven surface color even when the centers are baked correctly.
Ingredient substitutions and flavor choices
If South African amasi is unavailable, cold cultured buttermilk is the closest approved grocery alternative. Use the same total volume, but begin with slightly less because some buttermilk is thinner. Add the remainder gradually until the dough reaches the intended shaggy, soft consistency. The flavor and texture may differ from scones made with amasi.
Another approved option is plain whole milk Greek yogurt diluted with cold milk until thick but pourable. This can produce a slightly tangier and denser result. For the fat, firm chilled block baking margarine can replace the butter in the approved amount, although the finished crumb may be less rich. Avoid soft tub spread.
Flour labels also matter. South African self raising flour is generally unsalted, while American self rising flour commonly contains salt. The recipe card uses all purpose flour with separately measured leavening and salt to remove that uncertainty. If you choose an approved flour substitution, follow its corresponding omissions rather than adding all the original leavening and salt again.
For a different flavor, the approved options include a little vanilla and coarse sugar on the brushed tops, a modest amount of chocolate chips or dried cranberries with orange zest, or a cheddar and chive version with reduced sugar. Keep the plain formula as your starting point so you can recognize the intended dough consistency.
For a separate fruit flavored recipe rather than changing this plain batch, explore our orange raisin scones. They belong to the same broader baking family but are a distinct recipe.
Serving and keeping the texture
Let the baked scones cool on a wire rack for 10 minutes before splitting them while still warm. This short cooling period helps the crumb settle, and the rack allows steam to escape instead of collecting underneath.
Serve them plain or with butter, jam, or a little cream. Their gently sweet flavor also makes them suitable for a simple tea break without a rich topping. If you are serving several baked items, the plain scone provides a useful contrast to more heavily flavored pastries.
For later storage, allow the scones to cool completely on the rack before placing them in an airtight container. Closing warm scones into a container can trap moisture and soften their surfaces. The immediate cooling step is especially important because the recipe relies on a tender center without a damp underside.
For more baking guidance and related recipes, visit our easy biscuit recipe guide. It provides a broader starting point for understanding how different biscuit and scone methods produce different textures.
Frequently Asked Questions
What is amasi, and why is it used in these scones?
Amasi, also called maas, is a South African cultured milk. It supplies moisture and gentle tang, while its acidity reacts with baking soda to help the egg free dough rise. Its consistency also contributes to the soft, slightly sticky dough used in this recipe.
How can I tell when the scone dough has been mixed enough?
Stop when the flour is moistened and the dough looks shaggy, soft, and slightly sticky, without dry flour streaks. It should not be smooth or elastic. Bring it together with only two or three gentle folds before patting it to a 1-inch thickness.
How do I know when the amasi scones are fully baked?
Begin checking at 13 minutes during the approximately 15-minute bake at 400°F (200°C). Look for tall, mostly straight sides, lightly golden matte to satin tops, set pale to medium golden undersides, and a springy center. A toothpick inserted into the thickest scone should come out without wet or gummy batter.
Save This Recipe
Enter your email below and we'll send the link straight to your inbox. You'll also get fresh baking recipes each week.
More From Biscuits & Breads



You Might Also Like





thank you so much. custard powder or readily made custard?
Wow amazing recipe
Very interesting. Thanks for sharing