

Honey Buttermilk Bread makes two golden sandwich loaves with a tender, even crumb and a gentle balance of honey sweetness and cultured-buttermilk tang. The slices are lovely for sandwiches, toast, or French toast, and the crust can be finished soft or left a little firmer.

This is a yeast-raised bread, so allow time for two rises and complete cooling before slicing. The most useful part is knowing what to look for along the way: elastic dough, a properly proofed crown, and a fully baked center.
Why This Honey Buttermilk Bread Works
Each of the main ingredients has a particular job in this dough:
- Cultured buttermilk brings moisture and a pleasant tang. Warm it gently to 105–110°F (40–43°C) before mixing.
- Honey adds sweetness and encourages a golden crust. Because the top may brown before the center is ready, crust color needs a separate check during baking.
- Bread flour provides the structure needed for a tall, sliceable loaf. Proper kneading develops that structure without making the dough dry.
- Butter enriches the dough and contributes to its tender sandwich crumb. A separate butter finish softens the baked crust.
Why Buttermilk and Baking Soda Work Together
Although yeast provides the main rise, this formula also includes baking soda. When baking soda meets the acidity in cultured buttermilk, it reacts and releases carbon dioxide. A little fizz in the mixing pitcher is normal.
The baking soda is part of this particular recipe, not a replacement for yeast. Keep the approved amount rather than swapping in baking powder. The yeast still needs to ferment the dough during both rises.
You’ll also notice a pinch of ground ginger in the yeast mixture. It belongs to the approved formula, but the important evidence that your yeast is active is the visible foam after 5–7 minutes, not the presence of ginger.
For a useful comparison, our buttermilk biscuit recipe shows how the same cultured dairy ingredient can be used in a different kind of dough. These sandwich loaves depend primarily on yeast fermentation rather than the quick rise associated with biscuits.
Honey Buttermilk Bread
Two yeast-raised sandwich loaves enriched with cultured buttermilk, honey, and butter. The bread has a soft, even, sliceable crumb, with an optional firmer golden crust finish.
Ingredients
- 2 1/4 teaspoons active dry yeast 1 standard 7-gram packet; dry, unexpired, and at room temperature
- 1 teaspoon granulated sugar 4 grams; for blooming the yeast
- 1 pinch ground ginger About 1/16 teaspoon or 0.2 gram
- 1/4 cup water 60 ml; warmed to 105–110°F (40–43°C)
- 2 cups cultured buttermilk 480 ml; whole or low-fat, shaken well and gently warmed to 105–110°F (40–43°C)
- 1/3 cup honey 113 grams; pure liquid clover or wildflower honey at room temperature
- 3/4 teaspoon baking soda 3.6 grams; dry and lump-free
- 3/4 teaspoon fine sea salt 4.5 grams; fine-grained table salt may be used, or 1 teaspoon fine kosher salt
- 1/4 cup unsalted butter for the dough 4 tbsp or 57 grams; melted and cooled to 100–105°F (38–41°C)
- 6 cups unbleached bread flour 750 grams total; fluff, spoon, and level if measuring by volume; divide into two 3-cup portions
- 1–2 tablespoons unsalted butter for finishing 14–28 grams; melted and kept warm for brushing the hot baked loaves
Instructions
- Combine the warm water, sugar, ground ginger, and active dry yeast in the stand-mixer bowl. Stir gently and leave undisturbed for 5–7 minutes. A visible, opaque foam layer should form. If the mixture remains flat, discard it and restart with fresh yeast and water at the correct temperature.
- In a measuring pitcher, whisk the warmed cultured buttermilk, honey, baking soda, and salt until blended. A little fizz is normal. Pour the mixture into the foamy yeast.
- Add the first 3 cups (375 grams) of bread flour. With the paddle attachment, mix on low speed for about 3 minutes until the mixture becomes smooth and no dry flour pockets remain.
- Pour in the melted dough butter, cooled to 100–105°F (38–41°C), and mix until no oily streaks remain. Switch to the dough hook. Add the remaining 3 cups (375 grams) of flour gradually, about 1 cup at a time, allowing each addition to absorb before adding the next.
- Knead with the dough hook on low speed for 6–8 minutes, until the dough is smooth, elastic, and pulls away from the mixer sides while remaining slightly attached at the bottom. Check a small piece by stretching it gently into a thin, translucent windowpane. For hand kneading, work the dough on a lightly floured surface for 8–10 minutes until it reaches the same condition.
- Shape the dough into a ball and transfer it to a lightly oiled large bowl, turning once to coat. Cover with a damp towel or plastic wrap. Leave in a draft-free place at 75–80°F (24–27°C) for approximately 90 minutes, until doubled in volume. Use the increase in volume, rather than the clock alone, to judge readiness.
- Grease two metal loaf pans. Gently deflate the risen dough and transfer it to a clean, lightly oiled surface. Divide it into two equal portions with a bench scraper. Pat or roll each portion into an 8-by-12-inch rectangle. Starting at a short edge, roll tightly into a cylinder, pinch the long seam closed, tuck in the ends, and center each loaf seam-side down in its prepared pan.
- Lightly brush or spray the shaped dough surfaces with a little neutral oil or melted butter used for pan preparation. Cover the pans loosely with a clean towel. Proof for approximately 40–45 minutes, until each rounded crown rises about 1 inch above the pan rim. Press a floured finger gently about 1/2 inch into the dough: a ready loaf should recover roughly halfway within 2–3 seconds. If the dent springs back immediately, allow another 5–10 minutes; if it stays fully sunken, bake promptly.
- During the final proof, preheat the oven to 375°F (190°C) using conventional bake, with the rack in the lower-middle position. Place the pans on the rack with 2–3 inches of clearance between them. Bake for approximately 28–32 minutes. At 18–20 minutes, inspect the crusts. If they are already deep golden amber, loosely tent the tops with aluminum foil and continue baking.
- Check the center of each loaf with an instant-read thermometer inserted diagonally through the upper side. Remove the loaves when the center reads 196–200°F (91–93°C). A golden crust and a hollow sound when the bottom is tapped are supporting signs, but neither replaces the thermometer. If the center is below 196°F, continue baking and check again.
- For the standard soft sandwich crust, immediately brush the hot loaf crowns with 1–2 tablespoons of melted butter. Rest the loaves in their pans for 10 minutes. Loosen the edges carefully, remove the loaves, and place them upright on a wire cooling rack. Drape a clean, dry cotton towel over them to soften the crust as steam escapes.
- Leave the loaves on the rack for at least 90 additional minutes, until completely cooled, before cutting with a serrated bread knife. For an optional firmer, golden crust instead of the standard soft finish, omit the post-bake butter and cooling towel and cool the loaves uncovered.
Notes
- Yield: Two standard sandwich loaves, each cut into 10 generous slices. One serving is one slice, approximately 75 grams baked.
- Equipment: Heavy-duty stand mixer with paddle and dough-hook attachments, or a large mixing bowl and sturdy wooden spoon for hand mixing; two greased heavy-gauge metal loaf pans; instant-read digital thermometer; bench scraper; lightly oiled bowl; measuring equipment and kitchen scale; pastry brush; clean lint-free cotton towels; plastic wrap; wire rack; serrated bread knife; optional rolling pin; and aluminum foil.
- The dough should be smooth and elastic, with mostly clean mixer sides and slight attachment at the bottom. Avoid adding excess flour simply to make the bowl completely clean.
- Use the approximately 1-inch crown height and halfway-recovering finger dent together to judge the second proof.
- The internal center temperature of 196–200°F (91–93°C) is the deciding doneness measurement. Crust color and hollow tapping are secondary signs.
- For a softer sandwich crust, use the finishing butter and dry cotton towel. For a firmer golden crust, omit both and cool uncovered.
- Unbleached all-purpose flour may replace the bread flour 1:1 by weight, using 750 grams. The loaf may have slightly less oven spring and a softer, more delicate crumb.
- If cultured buttermilk is unavailable, combine 2 scant cups (450 milliliters) whole milk with 2 tablespoons (30 milliliters) lemon juice or distilled white vinegar. Rest for 10 minutes until lightly curdled, then gently warm to 105–110°F (40–43°C). The crumb may be slightly less rich and velvety.
- For instant yeast, substitute 2¼ teaspoons (7 grams). Skip the bloom. Mix the instant yeast, ginger, sugar, and baking soda into the first 3 cups of flour. Combine the warm water, buttermilk, honey, and melted butter separately, then mix with the dry ingredients. Incorporate the remaining flour and knead as directed. Begin checking the first rise approximately 15 minutes earlier, using doubled volume as the deciding cue.
- For 24 pull-apart dinner rolls, divide the dough after its first rise into 24 equal pieces, approximately 60 grams of raw dough each. Form taut balls and arrange 12 in each of two buttered 9-by-13-inch metal pans in a 3-by-4 arrangement, or use two 9-inch round pans. Proof for 30–35 minutes until puffy. Bake at 375°F (190°C) for 18–22 minutes, checking for a center temperature of 195°F (91°C). Brush with melted butter after baking.
- For salt, substitute ¾ teaspoon fine table salt or 1 teaspoon fine kosher salt for the ¾ teaspoon fine sea salt.
- Store completely cooled bread at room temperature in a paper bread bag, linen bag, or airtight bread box for up to 3 days. Avoid refrigeration.
- For freezing, wrap cooled whole loaves or individual slices in two layers of plastic wrap followed by heavy-duty aluminum foil. Freeze for up to 3 months. Thaw wrapped bread at room temperature for approximately 2 hours, or toast frozen slices directly.
- For overnight preparation, shape the loaves into their pans, cover tightly, and refrigerate for 8–12 hours. Allow approximately 60–90 minutes at room temperature the next morning, or until the crowns and finger-dent response indicate readiness, before baking.
- Per-slice nutrition figures are source-provided estimates for a 20-slice yield.
Nutrition Information
- Calories 188 kcal
- Carbohydrate Content 33 g
- Cholesterol Content 8 mg
- Fat Content 3 g
- Protein Content 5 g
- Saturated Fat Content 2 g
- Serving Size 1 slice (1/20th of recipe)
- Sodium Content 183 mg
- Sugar Content 6 g
How to Tell When Your Dough Is Ready
Good sandwich bread depends on dough development and proofing, not simply following the clock. Three checkpoints help you decide when to move forward.
1. Look for Smooth, Elastic Dough
After kneading, the dough should look smooth and supple. In a stand mixer, it should pull away from most of the bowl’s sides while remaining slightly attached at the bottom.
That small amount of attachment is useful information. The dough does not need to become a dry, stiff ball that completely releases from every surface.
Gently stretch a small piece between your fingers. If it forms a thin, translucent sheet before tearing, it has reached the windowpane stage. If it breaks immediately, continue kneading and check again.
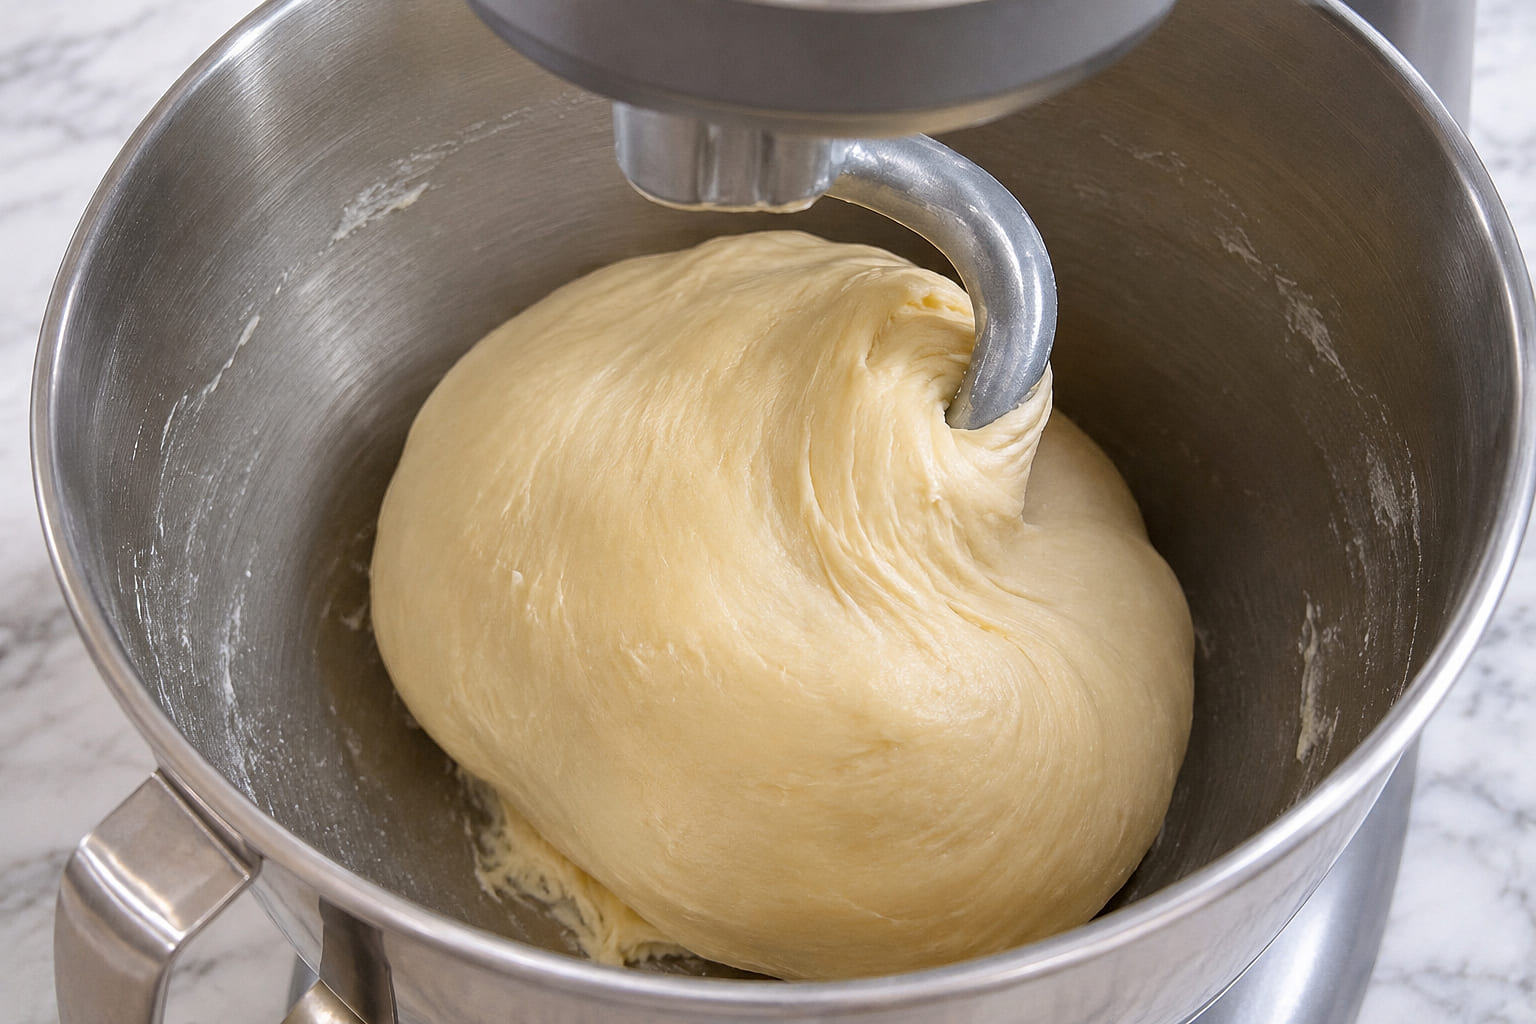
What to notice: A cohesive, smooth dough with mostly clean bowl sides is a better reference than adding flour until every trace of tackiness disappears.
If you’d like another example of handling soft enriched dough, the fluffy condensed milk bread guide offers a related bread-making approach.
2. Let the First Rise Reach Double Its Volume
Allow approximately 90 minutes in a draft-free place at 75–80°F (24–27°C). The deciding sign is dough that has approximately doubled in volume.
A cooler kitchen may change how quickly that happens. Follow the dough’s growth rather than moving on solely because the timer has finished.
3. Check Both Crown Height and the Finger Dent
After shaping, each loaf should sit seam-side down in its greased metal pan. The preferred 8½-by-4½-inch pans produce taller crowns, while 9-by-5-inch metal pans are also approved.
At the end of the second proof, look for a rounded crown approximately 1 inch above the pan rim. Then press a floured finger about ½ inch into the dough.
- The dent returns halfway within 2–3 seconds: The loaf is ready for the oven.
- The dent springs back immediately: Allow another 5–10 minutes of proofing and check again.
- The dent remains fully sunken: Bake promptly rather than extending the rise.
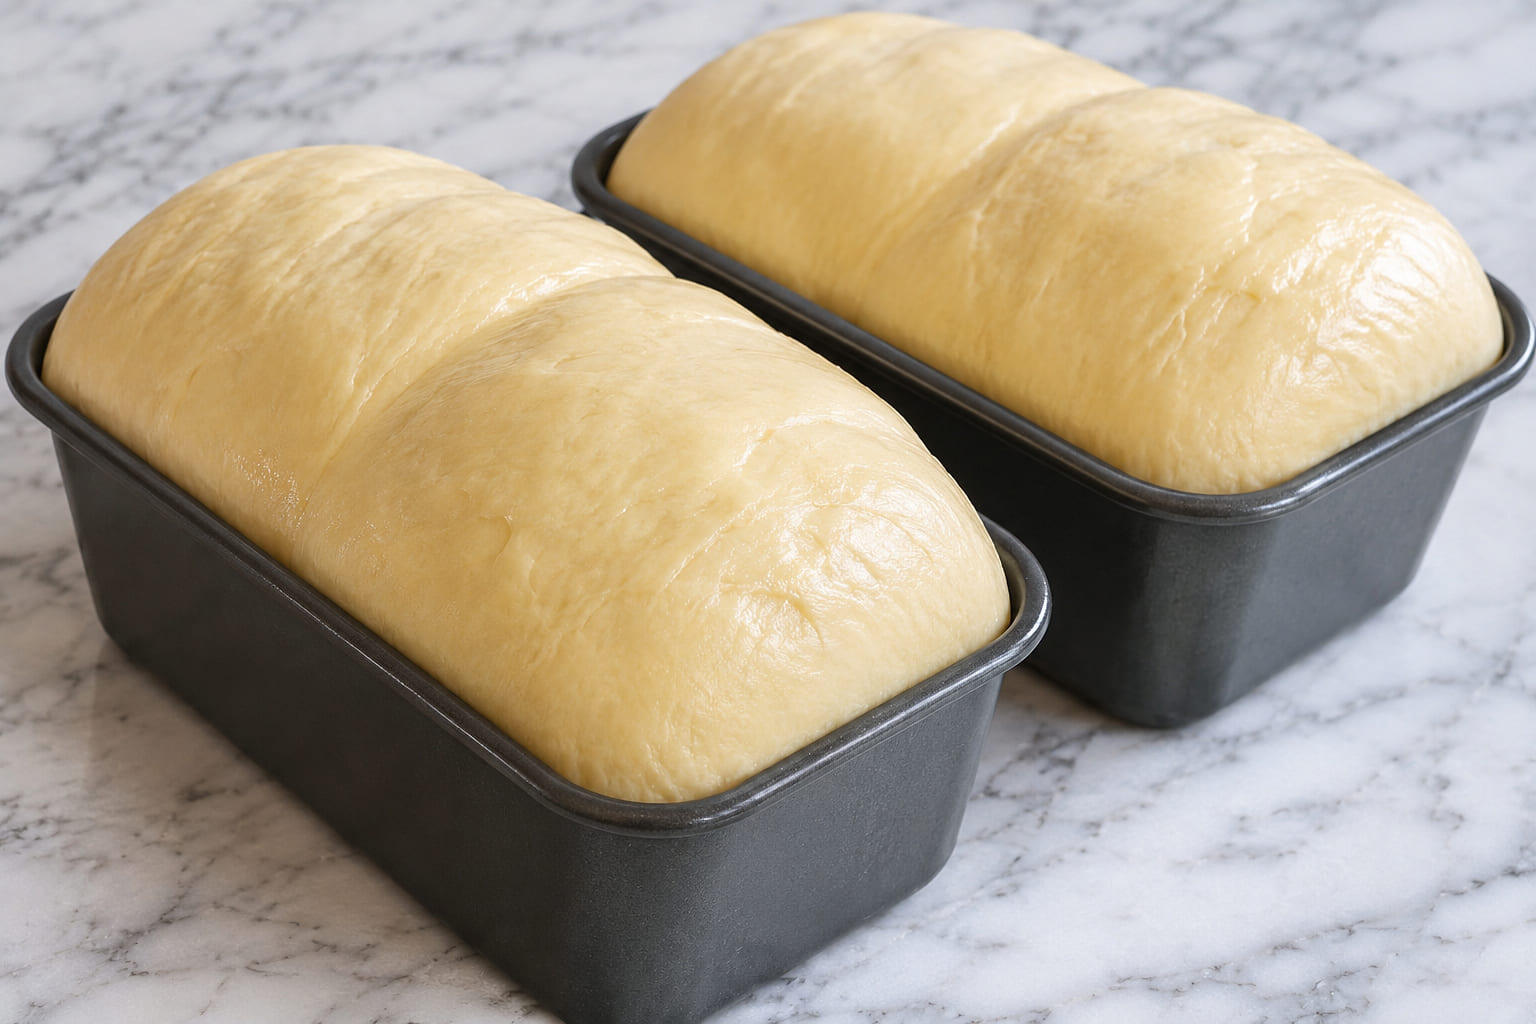
What to notice: The rounded crowns rise above the metal pan rims without appearing collapsed. Use the crown height and finger response together; neither the clock nor height alone tells the whole story.
The Two Checks That Prevent an Underbaked Center
Honey helps the crust brown, but a deeply colored top does not necessarily mean the middle has finished baking. Use two separate decisions to protect both the crust and crumb.
Check the Crust at 18–20 Minutes
Bake at 375°F (190°C) using conventional heat and a lower-middle oven rack. Keep 2–3 inches between the two pans.
At 18–20 minutes, look at the tops. If they are already deep golden amber, loosely tent them with aluminum foil. If they are not browning too quickly, leave them uncovered.
The foil is a conditional step, not a reason to remove the bread early. Continue baking until the centers reach the approved temperature.
Check the Center, Not Just the Color
Near the end of the approximately 28–32-minute bake, insert an instant-read thermometer diagonally through the upper side of each loaf toward its center.
The target is 196–200°F (91–93°C). If the center is below 196°F, keep baking and check again.
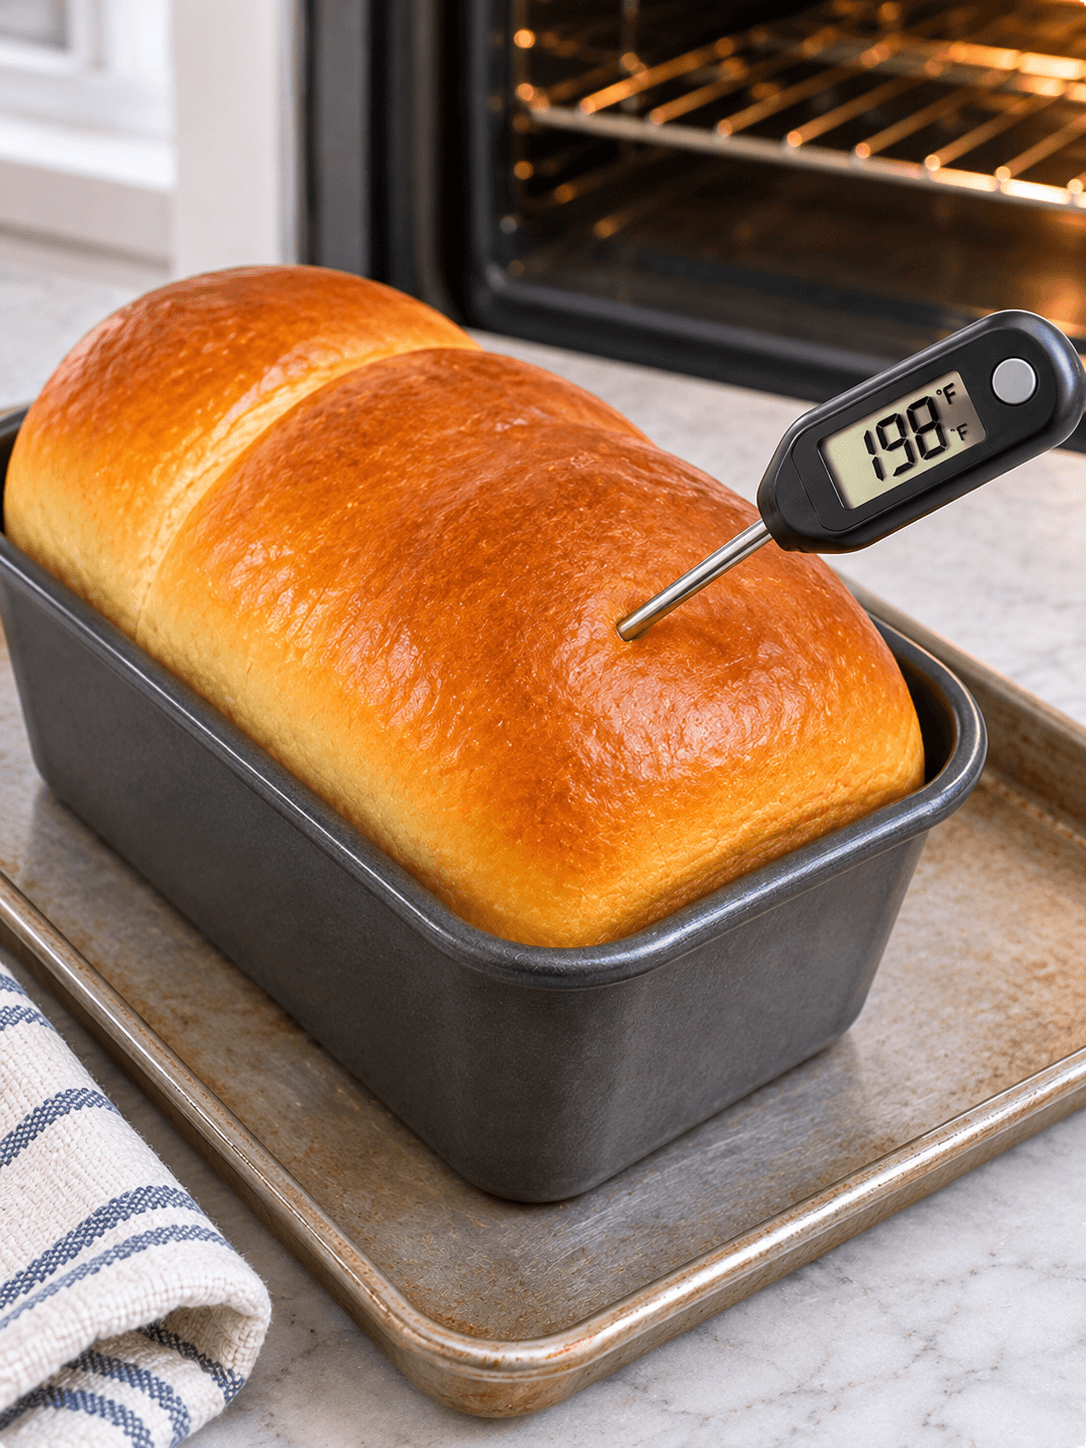
A golden to honey-chestnut top, lighter golden sides, and a hollow sound when tapped underneath are useful supporting signs. The internal reading is the deciding check because an attractive crust can hide an underbaked middle.
Choose Your Crust: Soft Sandwich or Golden Crisp
The finishing method changes how the crust feels after cooling. Choose the texture you want before the loaves leave the oven.
For a Soft Sandwich Crust
This is the standard Recipe Card finish. Brush the hot crowns immediately with 1–2 tablespoons of melted butter, leave the loaves in their pans for 10 minutes, then transfer them upright to a wire rack.
Drape a clean, dry cotton towel over the cooling loaves. The butter and escaping steam help condition the crust, giving it the softer finish suited to everyday sandwich slices.
For a Firmer Golden Crust
Skip the finishing butter and cooling towel. After the 10-minute pan rest, cool the loaves uncovered on a wire rack.
Whichever finish you choose, wait until the bread is completely cool before slicing. Allow at least 90 additional minutes on the rack after the pan rest. Cutting while the crumb is still setting can leave the slices gummy or difficult to cut neatly.
Common Honey Buttermilk Bread Problems
If something looks different from the expected result, these checks can help identify the most likely point to correct.
The Yeast Mixture Does Not Foam
Possible cause: The yeast may be inactive, or the water may not be at the approved temperature.
What to do: Discard the flat mixture and restart with fresh active dry yeast and water at 105–110°F (40–43°C). Look for a visible, opaque foam layer after 5–7 minutes before proceeding.
The Dough Feels Stiff or the Bread Turns Out Dense
Possible cause: Excess flour, insufficient kneading, or moving ahead before the dough has risen sufficiently may contribute.
What to do: Measure the flour carefully, preferably using the approved 750-gram weight. During kneading, look for smooth elasticity and the windowpane rather than trying to eliminate every bit of tackiness. During the first rise, wait for approximately doubled volume.
The Top Browns Before the Middle Is Done
Possible cause: The honey-enriched crust is coloring faster than the center is baking.
What to do: Keep the approved 375°F oven setting and check the crust at 18–20 minutes. Tent loosely with foil only when the top is already deep golden amber. Continue until the center reaches 196–200°F.
The Loaf Sinks or Collapses
Possible cause: The second rise may have gone too far, or the center may not have baked completely.
What to do next time: Check for the approximately 1-inch crown and halfway-recovering finger dent before baking. Confirm the center temperature before removing the loaf from the oven.
The Slices Feel Gummy
Possible cause: The center may have been underbaked, or the bread may have been sliced before cooling completely.
What to do next time: Use the thermometer as the final baking check, then allow the full cooling period before cutting with a serrated bread knife.
Storage, Freezing, and Overnight Preparation
Room temperature: Once fully cooled, keep the bread in a paper bread bag, linen bag, or airtight bread box for up to 3 days. Avoid refrigeration because it accelerates staling.
Freezing: Wrap completely cooled whole loaves or individual slices in two layers of plastic wrap, followed by heavy-duty aluminum foil. Freeze for up to 3 months.
Thawing: Leave wrapped frozen bread at room temperature for approximately 2 hours, or toast individual frozen slices directly.
Overnight preparation: Shape the loaves into their pans, cover tightly, and refrigerate for 8–12 hours. The next morning, allow approximately 60–90 minutes at room temperature, or until the crowns reach the approved height and the finger-dent test indicates readiness. Then bake as directed.
More Bread Recipes to Explore
If you enjoy a soft yeast-bread crumb but would rather bake individual portions, try these homemade fluffy bread rolls. They’re a useful next recipe when you want something to serve individually instead of slicing a loaf.
For a broader introduction to bread and biscuit baking, visit our complete guide to homemade biscuits and breads. It connects this sandwich loaf with other baking styles and techniques.
Frequently Asked Questions
Can I make honey buttermilk bread without cultured buttermilk?
Yes. Combine 2 scant cups (450 milliliters) whole milk with 2 tablespoons (30 milliliters) lemon juice or distilled white vinegar. Let stand for 10 minutes until lightly curdled, then gently warm to 105–110°F (40–43°C) before using. This provides acidity for the baking soda reaction, although the finished bread may have a slightly less rich, velvety crumb than bread made with cultured buttermilk.
Can I substitute all-purpose flour for bread flour?
Yes. Replace the 750 grams of unbleached bread flour with 750 grams of unbleached all-purpose flour. Follow the same mixing, kneading, and hydration instructions. Because all-purpose flour has less protein, the loaves may have slightly less oven spring and a softer, more delicate crumb.
Can I use instant yeast instead of active dry yeast?
Yes. Use 2¼ teaspoons (7 grams) instant yeast and skip the separate yeast bloom. Mix the instant yeast, ground ginger, sugar, and baking soda into the first 3 cups of flour. Separately combine the warm water, warm buttermilk, honey, and melted butter, then mix with the dry ingredients. Incorporate the remaining flour and knead as directed. Begin checking the first rise approximately 15 minutes earlier, using doubled volume as the deciding cue.
Can I make this bread as dinner rolls?
Yes. After the first rise, divide the dough into 24 equal pieces, approximately 60 grams of raw dough each, and form taut balls. Arrange 12 rolls in each of two buttered 9-by-13-inch metal pans in a 3-by-4 arrangement, or use two 9-inch round pans. Proof for 30–35 minutes until puffy, then bake at 375°F (190°C) for 18–22 minutes. Check for a center temperature of 195°F (91°C), and brush with melted butter after baking.
Once your loaves have cooled, slice only what you need and keep the rest ready for tomorrow’s sandwiches or toast. The key checkpoints are worth remembering: elastic dough, a properly proofed crown, and a center that reaches 196–200°F. Those three signs will serve you better than the clock alone.
Save This Recipe
Enter your email below and we'll send the link straight to your inbox. You'll also get fresh baking recipes each week.
More From Biscuits & Breads



You Might Also Like





The recipe tastes really nice I enjoyed it. Thank you