
Good buttermilk biscuits should rise tall, develop golden tops, and separate into tender, flaky layers when you split them warm. This recipe uses cold cultured buttermilk, refrigerator cold butter, and three gentle folds to build that texture without kneading the dough.

The important part is knowing what the mixture should look and feel like along the way. You will learn when to stop cutting in the butter, why a shaggy dough is desirable, how to preserve the cut edges, and which signs show that the biscuits are fully baked. The recipe makes 10 biscuits, with 15 minutes of preparation, 15 to 18 minutes in the oven, and a short cooling period.
The three essentials: Keep visible cold butter pieces, stop mixing while the dough is still shaggy, and cut straight down without twisting. Those details help preserve the distinct layers that make this style of biscuit so appealing.
This recipe was tested three times in the RecipesCrock kitchen before publishing, with the cold butter texture, fold sequence, cutting method, and doneness cues checked each time.
Buttermilk Biscuits
Classic American buttermilk biscuits made with cold cultured buttermilk, cold unsalted butter, and three gentle letter folds. Cut into 10 biscuits and bake until golden with distinct flaky layers and tender centers.
Ingredients
- 2 1/2 cups unbleached all purpose flour 313 grams. Spooned and leveled or weighed
- 2 to 3 tablespoons additional all purpose flour For lightly dusting the work surface, hands, and biscuit cutter. Use only as needed
- 1 tablespoon aluminum free double acting baking powder Measure accurately
- 1/2 teaspoon baking soda
- 2 teaspoons granulated sugar
- 1 teaspoon fine table salt Alternatively, use 1 1/4 tsp Diamond Crystal kosher salt
- 1/2 cup unsalted butter 8 tbsp (113 grams). Refrigerator cold at About 38-40°F (3-4°C), cut into 1/2-inch cubes
- 1 cup cultured buttermilk 240 ml. Cold, shaken well before measuring. For the dough
- 1 tablespoon additional cultured buttermilk. 15 ml. Cold (optional)
- 2 tablespoons additional cultured buttermilk 30 ml. Cold. Reserved separately for brushing biscuit tops before baking
- 2 tablespoons unsalted butter 28 grams. Melted. Optional post bake finish (optional)
Instructions
- Position an oven rack in the upper middle position and preheat to 425°F (218°C) using Conventional Bake mode. Line a light colored rimmed baking sheet with parchment paper. Keep the cubed butter and cultured buttermilk refrigerated until needed.
- In a large mixing bowl, whisk together 2 1/2 cups (313 grams) flour, 1 tablespoon baking powder, 1/2 teaspoon baking soda, 2 teaspoons sugar, and 1 teaspoon fine table salt until evenly distributed.
- Add the 1/2 cup (113 grams) cold cubed butter. Cut it into the dry ingredients using a pastry blender or two table knives until the mixture resembles coarse crumbs with visible flattened, pea sized butter pieces. Alternatively, pulse briefly in a food processor and return the mixture to the bowl. Do not blend the butter into a smooth paste. If it starts softening or smearing, refrigerate the bowl for 5-10 minutes before continuing.
- Make a well in the flour butter mixture and pour in 1 cup (240 milliliters) cold cultured buttermilk. Fold gently with a spatula or wooden spoon until shaggy, moist clumps form. A few loose dry flour bits are acceptable. Only if stubborn dry pockets refuse to combine, drizzle up to 1 tablespoon (15 milliliters) standby cold buttermilk onto those spots and fold once or twice more. Do not knead or mix until smooth.
- Lightly flour the work surface and hands. Turn out the shaggy dough with any loose crumbs and gently press it into a cohesive mass without kneading. Pat into a rectangle approximately 3/4 inch thick. Fold the left third toward the center, then fold the right third over it like a business letter. Rotate the dough 90 degrees, lightly dust if sticky, and pat back to approximately 3/4 inch thick. Repeat the letter fold, rotate another 90 degrees, and repeat once more, making exactly three letter folds total. Keep handling gentle so the cold butter remains in distinct pieces.
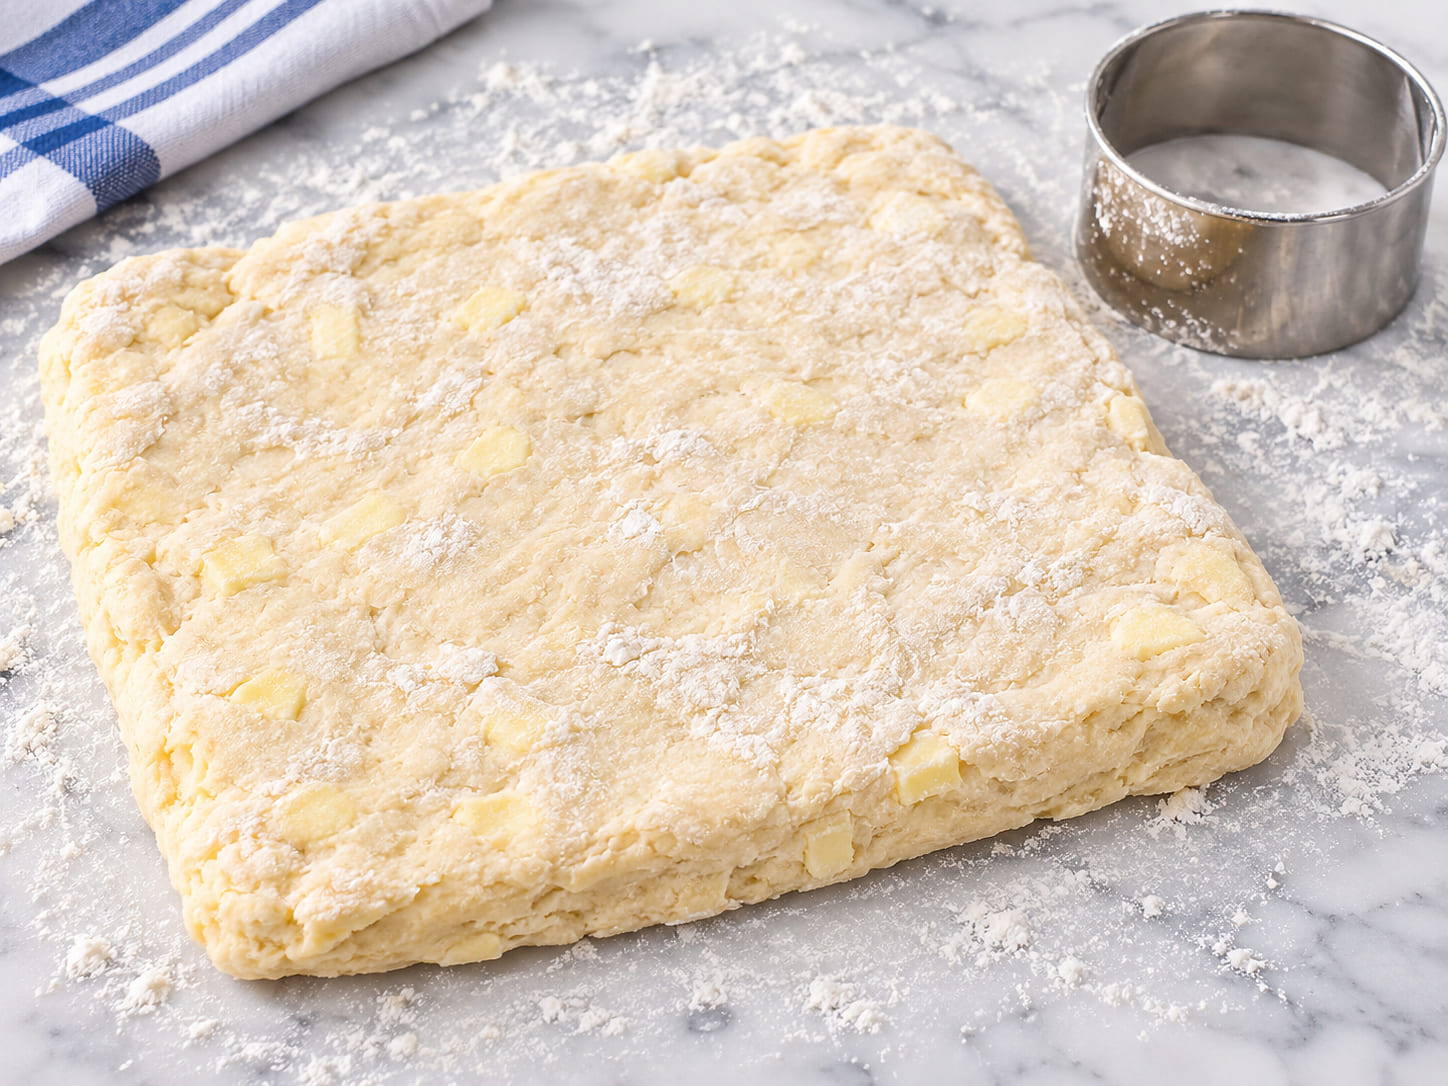
- Pat the folded dough evenly to 3/4 inch thick, forming a rectangle approximately 7 by 9 inches. Dip a sharp 2 1/2-inch round cutter in flour. Press straight down through the dough and lift straight up without twisting. Cut rounds close together to obtain approximately 7-8 biscuits. Gather the scraps gently only once, pat them to 3/4 inch thick without kneading, and cut the remaining 2-3 biscuits for 10 total. For the approved scrap minimizing alternative, cut the final rectangle into 10 equal squares with a sharp knife or bench scraper.
- Arrange all 10 biscuits on the prepared baking sheet with their outer edges lightly touching for taller biscuits with soft sides. Brush only the tops with the reserved 2 tablespoons (30 milliliters) cold buttermilk, avoiding drips down the cut sides. If crispier outer edges are preferred, arrange the biscuits approximately 1 inch apart instead. They may bake slightly shorter.
- Immediately place the baking sheet on the upper middle oven rack. Bake at 425°F (218°C) on Conventional Bake mode for 15-18 minutes, beginning to check at 15 minutes. The tops should develop deep golden brown peaks, the touching sides should remain lighter golden, and the undersides should be light to medium golden without scorching. Look for biscuits risen to roughly twice their cut height, visible horizontal flaky layers, and outer sides that feel set rather than doughy.
- Remove the biscuits from the oven. If using the optional finish, immediately brush their tops with 2 tablespoons (28 grams) melted unsalted butter. Leave the biscuits on the baking sheet for 5 minutes to let the interior crumb set slightly, then split and serve warm.
Notes
- One biscuit is one serving. The approved square variation makes 10 equal square biscuits.
- For the cold butter checkpoint, look for coarse crumbs with visible flattened pea sized butter pieces. If the mixture starts smearing, refrigerate for 5 to 10 minutes.
- Use the optional tablespoon of additional cold buttermilk only when stubborn dry flour pockets refuse to combine.
- For an approved salt alternative, replace 1 teaspoon fine table salt with 1 1/4 teaspoons Diamond Crystal kosher salt.
- For a cultured buttermilk alternative, place 1 tablespoon white distilled vinegar or fresh lemon juice in a liquid measuring cup. Add cold whole milk to the 1 cup (240 milliliter) mark. Stir and let stand for 5 to 10 minutes until lightly curdled. Add gradually, holding back 1 to 2 tablespoons if the dough hydrates quickly. The biscuits may have less tang and slightly less vertical lift.
- A seasoned 10 inch cast iron skillet may replace the parchment lined baking sheet. Arrange the biscuits touching and bake at 425°F (218°C), checking from 15 minutes and allowing up to 18 minutes as needed.
- For a honey butter finish, stir 1 tablespoon honey into the optional 2 tablespoons melted unsalted butter and brush over the hot biscuits.
- Store completely cooled baked biscuits airtight at room temperature for 2 to 3 days or refrigerated for up to 5 days. Reheat in a 300°F (149°C) oven for a few minutes until heated through or warm briefly in a microwave.
- Freeze freshly cut unbaked biscuits slightly apart on parchment for 1 to 2 hours until solid. Transfer to an airtight freezer bag for up to 3 months. Bake directly from frozen at 425°F (218°C) with edges touching, adding a few extra minutes. Tent loosely with foil if the tops brown before the centers finish.
- Completely cooled baked biscuits can be frozen tightly wrapped and bagged or in a freezer safe bag for up to 3 months. Thaw at room temperature or overnight in the refrigerator and warm at 300°F (149°C).
- Contains wheat and milk.
Why Cold Butter Makes a Difference
Cold butter is central to the flaky texture of these biscuits. The approved dough uses 1/2 cup (113 grams) unsalted butter, cut into 1/2 inch cubes while refrigerator cold, approximately 38 to 40°F (3 to 4°C). The goal is not to blend every piece completely into the flour. Small, flattened pieces need to remain visible because they support the formation of separate layers during baking.
When the butter has been cut in correctly, the mixture resembles coarse crumbs with scattered, flattened pieces about the size of peas. It should not look like uniformly fine sand, and it should not become a greasy paste. This is a useful checkpoint before any buttermilk enters the bowl. If the butter disappears into the flour, you have lost the visible pieces that the method depends on.
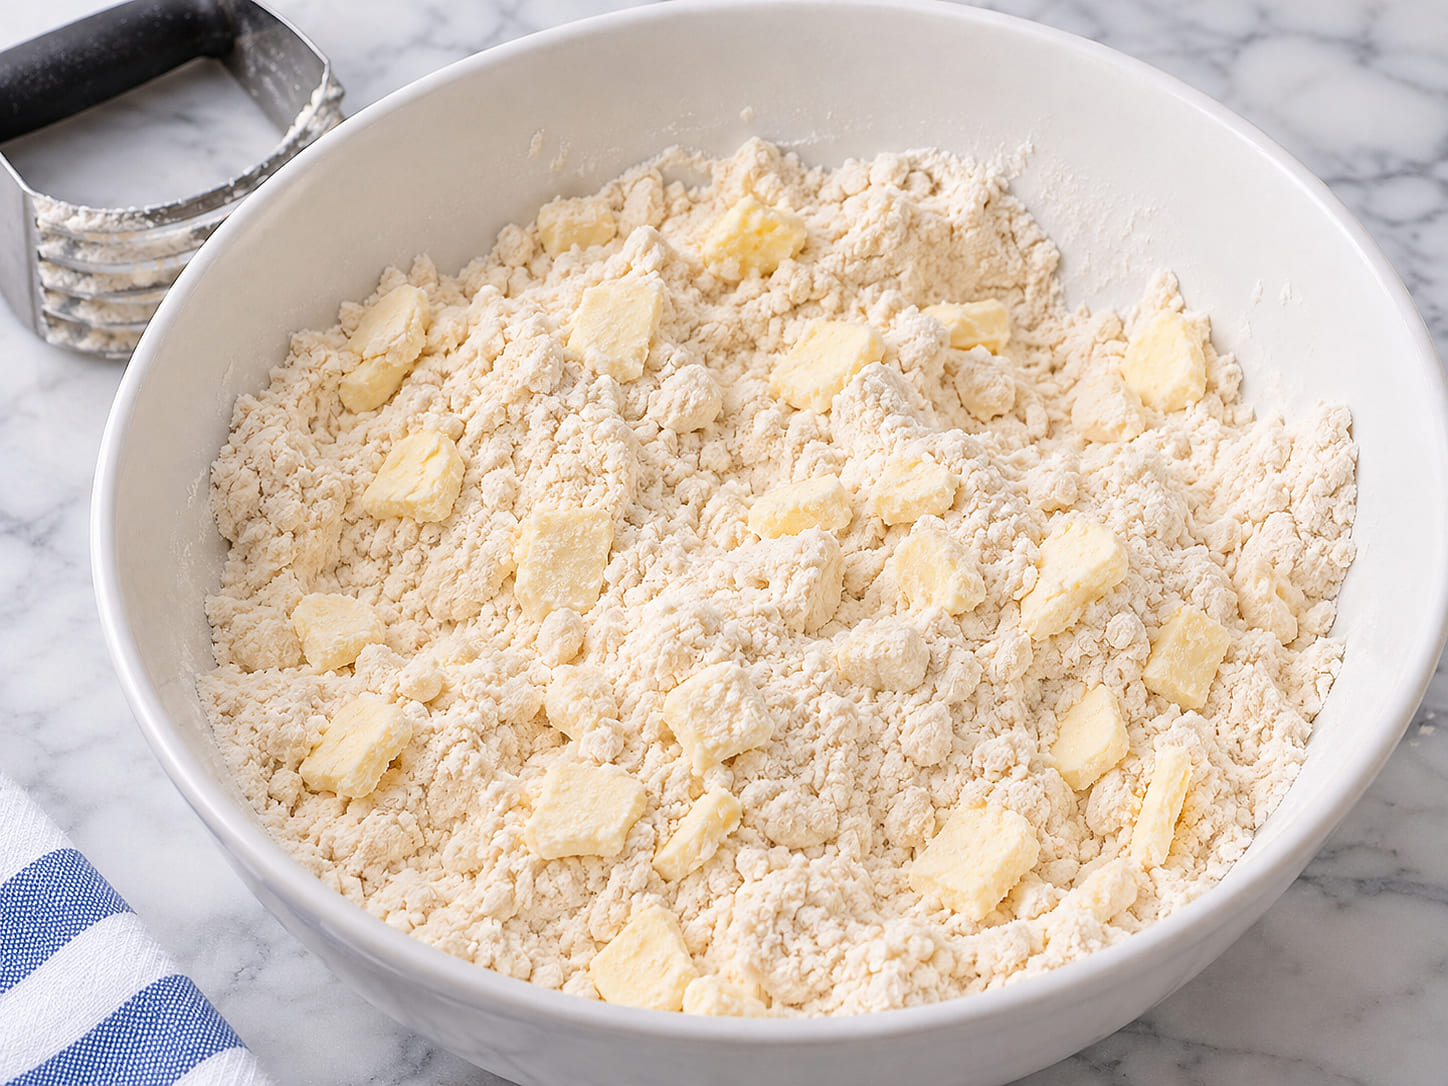
If the mixture starts looking shiny or the butter smears as you work, refrigerate the bowl for 5 to 10 minutes before continuing. This short recovery is useful when the ingredients have warmed during preparation. It is not an additional mandatory chilling stage. A pastry blender or two table knives gives you control over the butter pieces. A food processor is also suitable for brief pulsing, provided the mixture is returned to the bowl before the butter becomes too finely incorporated.
Recognizing the Right Dough Before Folding
The next important decision is when to stop mixing. After the cold cultured buttermilk is added, the dough should form moist, shaggy clumps. A few dry flour bits can still be visible. That appearance is intentional, not a signal to keep stirring until the mixture looks smooth.
Start with the measured 1 cup (240 milliliters) of cold cultured buttermilk. Fold gently rather than beating or kneading. If the dough forms moist clumps that can be pressed together, move on to shaping. If stubborn pockets of dry flour genuinely refuse to combine, use the separate standby allowance of up to 1 tablespoon (15 milliliters) cold buttermilk on those spots. Fold once or twice more and reassess.
Adding liquid simply because the surface looks rough can make the dough unnecessarily sticky. Similarly, continued mixing in pursuit of a smooth texture works against the gentle handling required here. The correct transition is from a loose, shaggy mixture to a cohesive mass formed by light pressing, not vigorous kneading.
Building Layers Without Overworking the Dough
The three letter folds are what turn the shaggy mixture into a layered biscuit dough. Once the dough is on a lightly floured surface, gently bring the loose pieces together and pat it into a rectangle approximately 3/4 inch thick. Fold the left third toward the middle, then bring the right third over it, like folding a business letter.
Rotate the dough 90 degrees and pat it back to approximately 3/4 inch thick. Repeat the fold, rotate another 90 degrees, and make the third and final fold. The important distinction is that the dough is being folded and lightly pressed, not kneaded. Three folds are enough for this approved method. Additional folding is not needed.
Use the additional flour sparingly on the surface and your hands when the dough sticks. You want the folded mass to hold together while keeping its layered structure and distinct butter pieces. Excessive pressing or handling can smear those pieces. A ruler is helpful because the final thickness matters when the dough is cut into biscuits.
Cutting and Arranging Biscuits for a Better Rise
For the round version, the final dough should be approximately 3/4 inch thick and about 7 by 9 inches. Use a sharp, floured 2 1/2 inch metal biscuit cutter. Press it straight down and lift it straight back up. Avoid twisting the cutter because twisting can compress the cut edges and interfere with an even rise.
Cut the rounds close together to obtain approximately 7 to 8 biscuits from the first pass. Bring the remaining scraps together gently just once, pat them back to the same thickness, and cut the final 2 to 3 biscuits. This produces the approved batch of 10 without repeatedly working the dough.
If you would rather avoid gathering round scraps, cut the final rectangle into 10 equal squares with a sharp knife or bench scraper. Square cutting preserves more of the original folded dough and reduces extra handling. Both shapes use the same dough and baking method.
Pan spacing is a texture choice. Arrange the biscuits with their edges lightly touching for the default result, which encourages taller biscuits with softer sides. If you prefer a crisper perimeter, leave approximately 1 inch between biscuits instead. The separated biscuits may be slightly shorter, so choose the arrangement that suits the finished texture you want.
Brush the tops with the reserved cold buttermilk, taking care not to let it run down the cut sides. Coating those edges can interfere with their rise. A parchment lined, light colored rimmed baking sheet is the standard pan. A seasoned 10 inch cast iron skillet is an approved alternative when you want slightly crisper bottoms and perimeter crusts.
How to Recognize Fully Baked Biscuits
Bake on the upper middle oven rack using Conventional Bake at 425°F (218°C). Begin checking at 15 minutes and allow up to 18 minutes as needed. The timer is a starting point, but the finished appearance gives a more complete answer.
Look first at the tops. They should have deep golden brown peaks rather than remaining pale. Where neighboring biscuits have touched, their sides can stay lighter golden. That contrast is expected and does not mean those areas must match the darker tops.
Next, check the underside and side structure. The bottom should be light to medium golden brown without dark scorching. The biscuits should have risen to roughly twice their original cut height, with recognizable horizontal flaky layers along the sides. Their outer sides should feel set rather than soft or doughy.
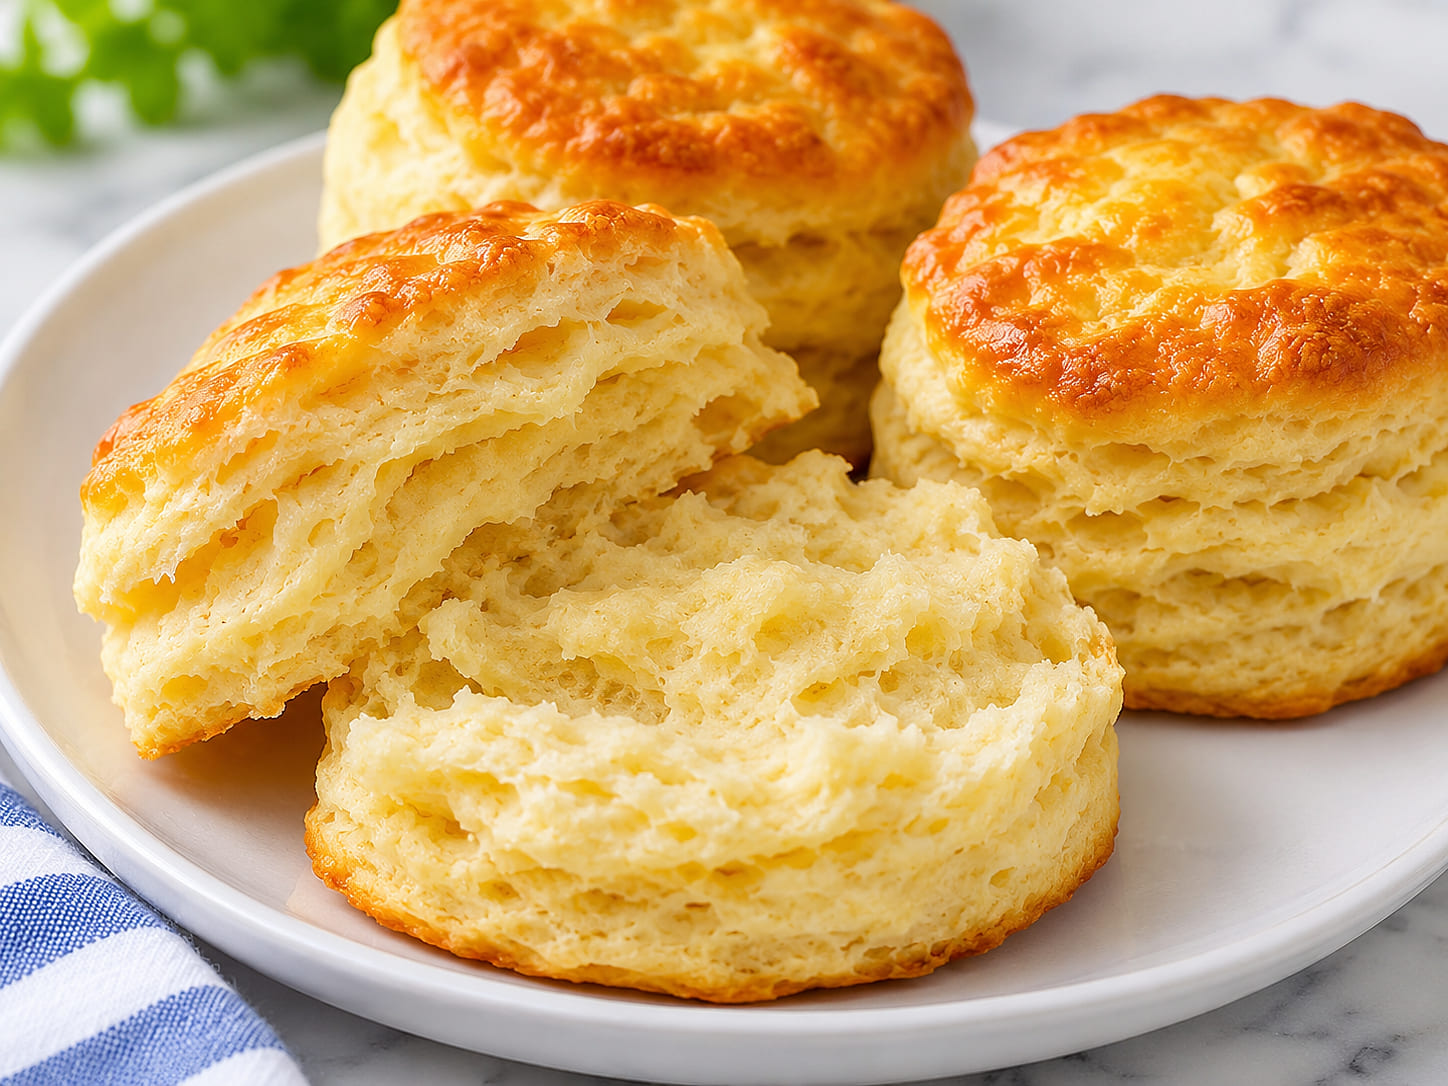
These signs work together. A deeply colored top alone is not the complete doneness test. If the top is browning but the sides still appear doughy, the biscuits have not yet reached all the approved physical cues. Once baked, leave them on the baking sheet for 5 minutes. This brief cooling period allows the interior crumb to set slightly before splitting and serving.
What to Check When the Texture Is Not Right
Biscuits spread rather than rising tall: Consider the butter texture before the liquid was added. The flour mixture should contain visible flattened cold pieces, not butter smeared into a paste. If the mixture warmed during preparation, the approved refrigerator rescue can help before shaping continues.
The dough feels excessively sticky: Consider whether additional buttermilk was added before it was necessary. The initial dough is meant to be shaggy, with a few dry bits still visible. Reserve extra liquid for genuinely stubborn dry pockets and use only light flour dusting during folding.
The layers are poorly defined: Check whether the dough was mixed until smooth, kneaded, or repeatedly pressed. Gentle handling and exactly three letter folds are the intended route to distinct layers. Also check that the round cutter was pressed straight down rather than twisted.
The outside looks finished but the interior seems doughy: Assess the sides, bottom, and overall rise alongside the top color. The outer sides should be set, the underside should be golden without scorching, and horizontal layers should be visible. Allow the approved 5 minute cooling period before splitting.
Useful Variations and Ingredient Choices
When cultured buttermilk is unavailable: Put 1 tablespoon white distilled vinegar or fresh lemon juice into a liquid measuring cup. Add cold whole milk to the 1 cup (240 milliliter) mark, stir, and let it stand for 5 to 10 minutes until lightly curdled. Add this mixture gradually, holding back 1 to 2 tablespoons if the dough hydrates quickly. This alternative is thinner and milder than cultured buttermilk, so the biscuits may have less tang and slightly less vertical lift.
For a different salt measurement: Use 1 1/4 teaspoons Diamond Crystal kosher salt in place of 1 teaspoon fine table salt. This is the approved seasoning alternative, not an invitation to change the other dry ingredients.
For a sweeter finish: Stir 1 tablespoon honey into the optional 2 tablespoons (28 grams) melted unsalted butter and brush it over the hot biscuits after baking. The melted butter belongs on the finished biscuits, not in the dough. The dough itself continues to use cold cubed butter.
Storing, Reheating, and Preparing Ahead
These biscuits are best served on the day they are baked. For leftovers, allow them to cool completely before placing them in an airtight container. They can remain at room temperature for 2 to 3 days or be refrigerated in an airtight container for up to 5 days. Cooling before sealing is part of the approved storage method.
To serve stored biscuits warm, place them in a 300°F (149°C) oven for a few minutes until heated through. A brief microwave warming is another option. For longer storage, completely cooled baked biscuits can be wrapped tightly and bagged, or sealed in a freezer safe bag, for up to 3 months. Thaw at room temperature or overnight in the refrigerator before warming in the oven.
Freezing before baking is especially useful when you want freshly baked biscuits later. Arrange the newly cut portions slightly apart on a parchment lined baking sheet and freeze for 1 to 2 hours until solid. Transfer them to an airtight freezer bag and keep frozen for up to 3 months. When ready to bake, place the frozen biscuits with their edges touching and bake directly from frozen at 425°F (218°C). Add a few extra minutes and check the same physical doneness signs used for fresh dough. If the tops brown before the centers finish, tent loosely with foil.
More Biscuit and Cultured Dairy Baking
Once you are comfortable with this cold butter method, the complete guide to homemade biscuits and breads offers a broader starting point for exploring related baking styles and techniques.
For another recipe using cultured dairy and gentle dough handling, try egg free amasi scones. They are a different baked style, but the attention to dough handling will feel familiar. If you want fruit and citrus flavors, lemon blueberry biscuits provide another direction. For a distinctly sweeter, crumbly tea biscuit rather than a tall American biscuit, explore condensed milk biscuits.
Frequently Asked Questions
Can I make buttermilk biscuits without cultured buttermilk?
Yes. Put 1 tablespoon white distilled vinegar or fresh lemon juice in a liquid measuring cup and add cold whole milk to the 1 cup (240 milliliter) mark. Stir and let stand for 5 to 10 minutes until lightly curdled. Add gradually, holding back 1 to 2 tablespoons if the dough hydrates quickly. This alternative is thinner and milder than cultured buttermilk, so the biscuits may have less tang and slightly less vertical lift.
Why didn't my buttermilk biscuits rise?
Check whether the butter remained cold with visible flattened pieces, whether the dough was mixed only until shaggy, and whether the three letter folds were gentle. Twisting the round cutter or repeatedly working scraps can compress the dough and interfere with an even rise. Keep the cutter straight and preserve the cold butter pieces.
Should buttermilk biscuits touch while baking?
For this recipe, arrange the cut biscuits with their outer edges lightly touching. This encourages taller biscuits with softer sides. If you prefer crisper outer edges, leave approximately 1 inch between biscuits. The separated biscuits may bake slightly shorter.
Can I freeze unbaked buttermilk biscuits and bake them from frozen?
Yes. Freeze freshly cut biscuits slightly apart on a parchment lined baking sheet for 1 to 2 hours until solid. Transfer to an airtight freezer bag for up to 3 months. Bake directly from frozen at 425°F (218°C) with their edges touching, adding a few extra minutes. Tent loosely with foil if the tops brown before the centers finish.
Save This Recipe
Enter your email below and we'll send the link straight to your inbox. You'll also get fresh baking recipes each week.
More From Biscuits & Breads

You Might Also Like



Thank you I would love to receive your nice recipes I love baking and learn more ideas/recipes thanks
Thank you for your kind words, Nombulelo! We’re glad you’re excited about baking and trying out new recipes. We’ll keep sharing our favorite recipes, and we hope you’ll enjoy making and devouring these melt-in-your-mouth buttermilk biscuits! If you have any questions or need any substitutions or variations, feel free to ask.
Nice